© 2026 InterSystems Corporation. All rights reserved.Privacy & TermsGuaranteeSection 508Contest Terms

iris-fhirfy 

Community Project
This project is maintained by its author and is not officially supported by InterSystems. For technical support, please contact the project developer.
This project is maintained by its author and is not officially supported by InterSystems. For technical support, please contact the project developer.
5
1 reviews
2
Awards
1.3k
Views
2
IPM installs
 10
10 2
2
Details
Releases (2)
Reviews (1)
Awards (2)
Issues
Videos (1)
Articles (2)
Dependencies (2)
Using IRIS and LLMs to help developers to convert raw data into FHIR
What's new in this version
- UI improvements
- Interoperability sample using the sample CSV to FHIR converter
![]()
- IRIS-FHIRfy
- Limitations
- Future work
- Dream team
IRIS-FHIRfy
IRIS-FHIRfy is a project aimed at simplifying healthcare data interoperability by helping developer to understand and design the integration workflow from the input data. Leveraging the power of InterSystems IRIS Interoperability and LLMs (Language Model Models), this project offers a seamless solution for converting raw data into the HL7 FHIR (Fast Healthcare Interoperability Resources) standard.
Motivation
FHIR, or Fast Healthcare Interoperability Resources, plays a pivotal role in healthcare interoperability by offering a standardized framework for exchanging healthcare data. It defines a set of data formats and APIs that enable seamless sharing of patient information, clinical data, and administrative details across various healthcare systems. FHIR’s importance lies in its ability to enhance data accessibility, improve care coordination, and facilitate the development of innovative healthcare applications.
Healthcare data is incredibly diverse, ranging from structured electronic health records (EHRs) to unstructured patient notes, images, and sensor data. This diversity poses a significant challenge for interoperability development. Integrating disparate data sources and ensuring they adhere to FHIR standards can be complex and time-consuming, often requiring extensive manual effort and expertise.
InterSystems IRIS, with its powerful interoperability capabilities, emerges as a valuable tool for addressing these challenges. IRIS provides a robust platform for data integration, transformation, and routing, making it easier to handle the variety of healthcare data formats. Its ability to connect disparate systems and support FHIR standards natively makes it a natural choice for healthcare interoperability projects.
The motivation behind the IRIS-FHIRfy project stems from recognizing the critical need to simplify the conversion of raw healthcare data into the FHIR format. By leveraging the capabilities of InterSystems IRIS and Language Model Models (LLMs), such as advanced natural language processing, IRIS-FHIRfy aims to empower developers with a streamlined solution. This project seeks to expedite the process of converting diverse healthcare data sources into FHIR, reducing development effort and accelerating the adoption of FHIR standards in healthcare applications.
How it works?
This project uses prompt engineering techniques on LLMs, like role-playing and prompt chaining.
There are 3 prompts which aims to breaking down the problem into less complex steps. Each prompt use the output of the previous, in order to improve reasoning.
Those steps cover from giving a techincal report, on the viewpoint of a interoperability developer, from samples of data that needs to be exchanged, passing to an implementation suggestion in high level, and finalizing with a code implementation in Python that converts the original raw data into FHIR standard - this implementation is intented to be refined by human developers.
The following diagrama pictures the whole process:
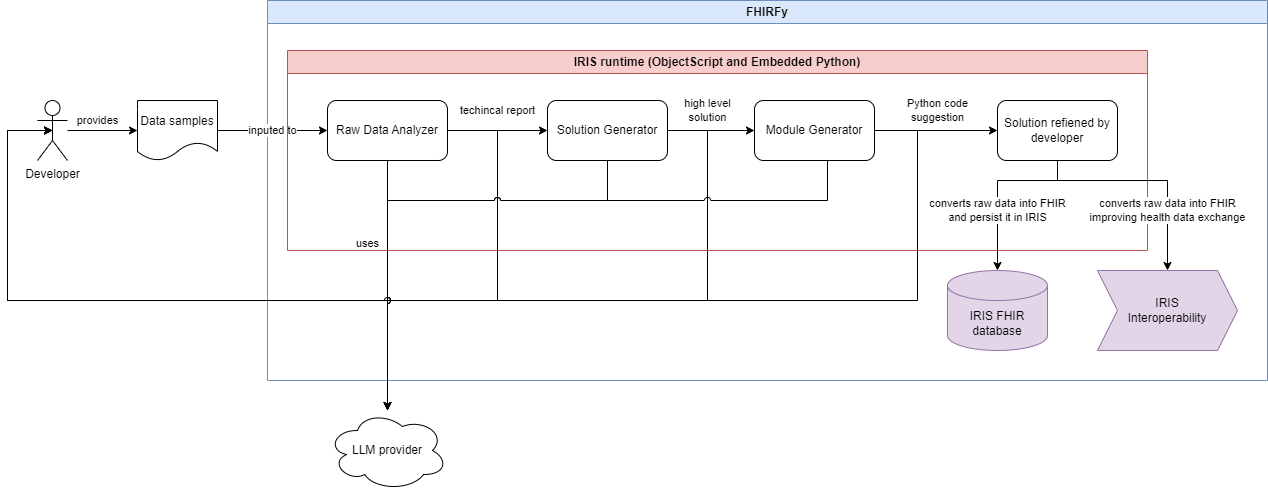
You can checkout the prompts in the following classes: RawDataAnalyzer, SolutionSuggestion and SolutionModuleGenerator.
Prerequisites
Make sure you have git and Docker desktop installed.
Installation
Setting a LLM API key
In order to us a LLM service, you need to set an API key.
Currently, this project supports Google Gemini and OpenAI LLM service is supported.
You can setup your LLM API key in the following way:
- On the web application, filling the “LLM API Key” textbox.
- On the REST API, settnig the
X-FHIRFY-LLM-API-KEYheader with your API key. - On the docker container or IPM package, setting the
OPENAI_API_KEYandGEMINI_API_KEYenvironment variables.
# OpenAI API key
export OPENAI_API_KEY=$OPENAI_API_KEY
# Google Gemini API key
export GEMINI_API_KEY=$GEMINI_API_KEY
Docker
Clone/git pull the repo into any local directory
$ git clone https://github.com/jrpereirajr/iris-fhirfy.git
Open the terminal in this directory and run:
$ docker-compose up -d
IPM
Open IRIS for Health installation with IPM client installed. Call in any namespace:
USER>zpm "install iris-fhirfy"
This will install FHIR server in FHIRSERVER namespace.
Or call the following for installing programmatically:
set sc=$zpm("install iris-fhirfy")
Getting started
You can try the project by:
- REST API
- Web application
- VS Code extension
Let’s details them in the following sections.
API
The API is available at http://localhost:32783/csp/api/dc/fhirfy.
In the examples below, the parameter ?mockName=<mockName> was used in order to get a reproducible result. All the mock data was generated using Googgle Gemini.
Feel free to remove the mockName parameter if you want to check the results using a LLM. Note that for this case you’ll need to provide two header to the API call:
- An LLM provider in the
X-FHIRFY-LLM-PROVIDERheader.- Currently, values accepted are
geminiandopenai.
- Currently, values accepted are
- A LLM API key in the
X-FHIRFY-LLM-API-KEYheader.
Please also note that if you try the API setting an API key, you may get different results than those presented here.
Trying without a LLM service API key
I’m assuming you are running the project into a container. So first, let’s access the container:
docker exec -it iris-fhirfy-iris-1 bash
Now you are ready to try the API.
You can also try the API using the provided Postman collection.
To call the API using mocked data, just append ?mockName=<mockName> to the URL. For instance:
# note: if you are running inside the container replace the port 52773 to 32783
port=52773 && \
curl -X POST http://localhost:${port:-52773}/csp/api/dc/fhirfy/analyze-data?mockName=simple-csv \
    -u "_system:SYS" \
    -H "Content-Type: application/json" \
     --data-binary '{
    "input": {
        "rawData": "Patient ID,Namel\n1,John Doe\n2,Jane Smith\n3,Michael Johnson\n4,Emily Williams\n5,David Brown"
    }
}'
Currently, the following mocks are available:
simple-csv: Mock data for a simple CSV as input
Now, let’s detail each API endpoint.
Raw data Analysis
This endpoint is used to analyze raw data and generate an analysis report. The intent of it is to help developers with a automated overview of the data they are working with on a interoperability point of view.
In order to try it, grab a sample of the data your are interested in convert to FHIR and present it to the /analyze-data endpoint.
Let use a simple raw data for this example, consisting of a trivial CSV data containing basic patient information, like this:
Patient ID,Patient Name
1,John Doe
2,Jane Smith
3,Michael Johnson
4,Emily Williams
5,David Brown
Thus, you could send the following request to the /analyze-data endpoint to get an analysis report on the raw data:
rawData="Patient ID,Namel\n1,John Doe\n2,Jane Smith\n3,Michael Johnson\n4,Emily Williams\n5,David Brown" && \
analysis=$(curl -X POST http://localhost:${port:-52773}/csp/api/dc/fhirfy/analyze-data?mockName=simple-csv \
    -u "_system:SYS" \
    -H "Content-Type: application/json" \
    --data-binary '{
    "input": {
        "rawData": "$rawData"
    }
}') && \
echo $analysis
You’ll get a answer like this (here formatted to improve readability):
{
    "markdownResponse": "**Data Structure and Content**\n\nThe provided data is a simple comma-separated value (CSV) file with two columns:\n\n* **Patient ID:** A unique identifier for each patient.\n* **Name:** The patient's name.\n\n**Example Data**\n\n```\nPatient ID,Name\n1,John Doe\n2,Jane Smith\n3,Michael Johnson\n4,Emily Williams\n5,David Brown\n```\n\n**Working with the Data**\n\nTo work with this data effectively, you can use a variety of tools and techniques. Some common options include:\n\n* **Spreadsheets:** You can import the CSV file into a spreadsheet program, such as Microsoft Excel or Google Sheets. This will allow you to view and manipulate the data in a tabular format.\n* **Databases:** You can also import the CSV file into a database, such as MySQL or PostgreSQL. This will allow you to store and query the data in a structured way.\n* **Programming Languages:** You can use a programming language, such as Python or Java, to read and parse the CSV file. This will give you the most flexibility in terms of how you work with the data.\n\n**Additional Notes**\n\n* The data is in a simple format, but it is important to note that the data may contain errors or inconsistencies.\n* The data may also be missing important information, such as the patient's age or gender.\n* It is important to clean and validate the data before using it for any analysis or decision-making."
}
The anwser provided is formatted in markdown. Let’s see it rendered in the browser:
Data Structure and Content
The provided data is a simple comma-separated value (CSV) file with two columns:
- Patient ID: A unique identifier for each patient.
- Name: The patient’s name.
Example Data
Patient ID,Name
1,John Doe
2,Jane Smith
3,Michael Johnson
4,Emily Williams
5,David Brown
Working with the Data
To work with this data effectively, you can use a variety of tools and techniques. Some common options include:
- Spreadsheets: You can import the CSV file into a spreadsheet program, such as Microsoft Excel or Google Sheets. This will allow you to view and manipulate the data in a tabular format.
- Databases: You can also import the CSV file into a database, such as MySQL or PostgreSQL. This will allow you to store and query the data in a structured way.
- Programming Languages: You can use a programming language, such as Python or Java, to read and parse the CSV file. This will give you the most flexibility in terms of how you work with the data.
Additional Notes
- The data is in a simple format, but it is important to note that the data may contain errors or inconsistencies.
- The data may also be missing important information, such as the patient’s age or gender.
- It is important to clean and validate the data before using it for any analysis or decision-making.
As you can see, the LLM provides a pretty decent overview of the data.
Solution suggestion
This endpoint is used to suggest a solution given the analysis report and the raw data.
The LLM is used here to propose a solution to the problem, in a high level description.
This is a step futher in helping developers to understand and design the workflow from the input data.
For instance, using the output from the previous endpoint, you could send the following request to the /suggest-solution endpoint to get a sugestion of Python modules and how to wrap them in order to convert the raw data to FHIR format:
suggestion=$(curl -X POST http://localhost:${port:-52773}/csp/api/dc/fhirfy/suggest-solution?mockName=simple-csv \
    -u "_system:SYS" \
    -H "Content-Type: application/json" \
    --data-binary '{
    "input": {
        "rawData": "$rawData",
        "analysis": "$analysis"
    }
}') && \
echo $suggestion
You’ll get this answer like this (here formatted to improve readability):
{
    "solutionSuggestion": {
        "name": "FHIR Bundle Creator",
        "description": "This solution will transform raw data into a FHIR Bundle resource.",
        "subModules": {
            "subModule": [{
                "name": "DataParser",
                "description": "Parses the raw data and extracts the patient ID and name."
            }, {
                "name": "FHIRBundleCreator",
                "description": "Creates a FHIR Bundle resource from the parsed data."}]
        },
        "pseudoCode": "1. Use the DataParser sub module to parse the raw data and extract the patient ID and name.\n2. Use the FHIRBundleCreator sub module to create a FHIR Bundle resource from the parsed data.\n3. Save the FHIR Bundle resource to a file."
    }
}
As you can see, the LLM returns a high level description of the coherence of the solution in this simple example. For a CSV like the one in the input, it makes sense having two modules, a fisrt one to parse the data and then a second one to create a FHIR Bundle resource on the output of the first.
Solution generation
Now that you have an overview of the raw data analysis and an idea of the solution, you ask to the LLM to suggestion now how you can start implementing it. This could be achieved by the endpoint /generate-module, using the previous API answers.
Following the example above, you could send the following request to the /generate-module endpoint to get a sugestion of Python modules and how to wrap them in order to convert the raw data to FHIR format:
generated=$(curl -X POST http://localhost:${port:-52773}/csp/api/dc/fhirfy/generate-module?mockName=simple-csv \
    -u "_system:SYS" \
    -H "Content-Type: application/json" \
    --data-binary '{
    "input": {
        "analysis": "$analysis",
        "solutionSuggestion": "$suggestion"
    }
}') && \
echo $generated
You’ll get this answer like this (here formatted to improve readability):
{
    "name": "fhir_bundle_creator",
    "description": "This module transforms raw data into a FHIR Bundle resource.",
    "dependencies": "fhir.resources==0.12.0",
    "files": [
        {
            "name": "__init__.py",
            "description": null,
            "source-code": "from .data_parser import DataParser\nfrom .fhir_bundle_creator import FHIRBundleCreator"
        },
        {
            "name": "main.py",
            "description": null,
            "source-code": "from fhir_bundle_creator import __init__\n\ndef main():\n    # Parse the raw data\n    data_parser = __init__.DataParser()\n    patient_data = data_parser.parse_data('data.csv')\n\n    # Create a FHIR Bundle resource\n    fhir_bundle_creator = __init__.FHIRBundleCreator()\n    fhir_bundle = fhir_bundle_creator.create_fhir_bundle(patient_data)\n\n    # Save the FHIR Bundle resource to a file\n    with open('fhir_bundle.json', 'w') as f:\n        f.write(fhir_bundle.json())\n\nif __name__ == '__main__':\n    main()"
        },
        {
            "name": "data_parser.py",
            "description": null,
            "source-code": "import csv\n\nclass DataParser:\n    def parse_data(self, filename):\n        \"\"\"Parses the raw data and extracts the patient ID and name.\n\n        Args:\n            filename: The name of the CSV file containing the raw data.\n\n        Returns:\n            A list of dictionaries, where each dictionary contains the patient ID and name.\n        \"\"\"\n\n        with open(filename, 'r') as f:\n            reader = csv.reader(f)\n            next(reader)  # Skip the header row\n\n            patient_data = []\n            for row in reader:\n                patient_data.append({\n                    'patient_id': row[0],\n                    'name': row[1]\n                })\n\n        return patient_data",
            "functions": {
                "function": {
                    "name": "parse_data",
                    "description": "Parses the raw data and extracts the patient ID and name.",
                    "input": {
                        "parameter": {
                            "name": "filename",
                            "type": "str",
                            "description": "The name of the CSV file containing the raw data."
                        }
                    },
                    "output": "A list of dictionaries, where each dictionary contains the patient ID and name."
                }
            }
        },
        {
            "name": "fhir_bundle_creator.py",
            "description": null,
            "source-code": "from fhir.resources.bundle import Bundle\nfrom fhir.resources.patient import Patient\n\nclass FHIRBundleCreator:\n    def create_fhir_bundle(self, patient_data):\n        \"\"\"Creates a FHIR Bundle resource from the parsed data.\n\n        Args:\n            patient_data: A list of dictionaries, where each dictionary contains the patient ID and name.\n\n        Returns:\n            A FHIR Bundle resource.\n        \"\"\"\n\n        bundle = Bundle()\n        bundle.type = 'collection'\n\n        for patient in patient_data:\n            fhir_patient = Patient()\n            fhir_patient.id = patient['patient_id']\n            fhir_patient.name = [{'family': patient['name']}]\n\n            bundle.entry.append({\n                'resource': fhir_patient\n            })\n\n        return bundle",
            "functions": {
                "function": {
                    "name": "create_fhir_bundle",
                    "description": "Creates a FHIR Bundle resource from the parsed data.",
                    "input": {
                        "parameter": {
                            "name": "patient_data",
                            "type": "list",
                            "description": "A list of dictionaries, where each dictionary contains the patient ID and name."
                        }
                    },
                    "output": "A FHIR Bundle resource."
                }
            }
        }
    ]
}
As you can see, the API generated an implementation in Python that is intended to convert the raw data into a FHIR Bundle resource. The source code is available in the python directory.
Important to note that this suggestion of implementation is not perfect. Probably some tunning will be necessary.
You also can download the module using the endpoint /download?moduleName=<module-name>. In the example above, run the following command to download the module source code:
cd /tmp && \
mkdir test1 && \
curl -X GET http://localhost:${port:-52773}/csp/api/dc/fhirfy/download?moduleName=fhir_bundle_creator \
    -u "_system:SYS" \
    -H "Content-Type: application/octet-stream" \
    -OJ && \
ls *.tar.gz
This will create a file called fhir_bundle_creator.tar.gz in the current directory. To extract the files:
mkdir fhir_bundle_creator && \
tar -xzf fhir_bundle_creator.tar.gz -C fhir_bundle_creator && \
cd fhir_bundle_creator && \
ls
Refining the generated code
In this section a example of how to refine the generated code is presented, using the simple CSV as example. After such refinements a module able to convert the raw CSV data like the sample provided into FHIR is ready to use.
Here is assumed that you already have the module in the fhir_bundle_creator directory, as shown in the example above.
First, create a Python virtual environment for testing the generated module and install its dependecies:
python3 -m venv venv && \
source venv/bin/activate
If you won’t be able to install the virtual environment, try to install this package and try again:
apt-get update && apt-get install -y python3.10-venv
Now, install the dependencies:
pip install -r requirements.txt
You will get the following error:
(venv) irisowner@21ea027ba62d:/tmp/test1/fhir_bundle_creator$ pip install -r requirements.txt
ERROR: Could not find a version that satisfies the requirement fhir.resources==0.12.0 (from versions: 3.0.1, 4.0.0b1, 4.0.0, 5.0.0b1, 5.0.0b2, 5.0.0b3, 5.0.0, 5.0.1, 5.1.0, 5.1.1, 6.0.0b1, 6.0.0b2, 6.0.0b3, 6.0.0b4, 6.0.0b5, 6.0.0b6, 6.0.0b7, 6.0.0b8, 6.0.0b9, 6.0.0b10, 6.0.0b11, 6.0.0, 6.1.0, 6.2.0b1, 6.2.0b2, 6.2.0b3, 6.2.0, 6.2.1, 6.2.2, 6.4.0, 6.5.0, 7.0.0, 7.0.1, 7.0.2, 7.1.0)
ERROR: No matching distribution found for fhir.resources==0.12.0
To fix it, open the requirements.txt file and remove the version of the fhir.resources dependency:
nano requirements.txt
- fhir.resources==0.12.0
+ fhir.resources
pip install -r requirements.txt
The module generated by the LLM also needs a file called data.csv as input. Let’s create it:
echo "Patient ID,Name
1,John Doe
2,Jane Smith
3,Michael Johnson
4,Emily Williams
5,David Brown" > data.csv
Now, you are set to run the module:
python main.py
And guess what? It doesn’t work… :)
(venv) irisowner@21ea027ba62d:/tmp/test1/fhir_bundle_creator$ python main.py
Traceback (most recent call last):
  File "/tmp/test1/fhir_bundle_creator/main.py", line 17, in
    main()
  File "/tmp/test1/fhir_bundle_creator/main.py", line 5, in main
    data_parser = __init__.DataParser()
AttributeError: 'method-wrapper' object has no attribute 'DataParser'
This error is caused by a wrong way the LLM resolves modules denpencies. Let’s fix it:
nano main.py
- from fhir_bundle_creator import __init__
+ from data_parser import DataParser
+ from fhir_bundle_creator import FHIRBundleCreator
...
-     data_parser = __init__.DataParser()
+     data_parser = DataParser()
...
-     fhir_bundle_creator = __init__.FHIRBundleCreator()
+     fhir_bundle_creator = FHIRBundleCreator()
Let’s try run the module again:
python main.py
Traceback (most recent call last):
  File "/tmp/test1/fhir_bundle_creator/main.py", line 18, in
    main()
  File "/tmp/test1/fhir_bundle_creator/main.py", line 11, in main
    fhir_bundle = fhir_bundle_creator.create_fhir_bundle(patient_data)
  File "/tmp/test1/fhir_bundle_creator/fhir_bundle_creator.py", line 15, in create_fhir_bundle
    bundle = Bundle()
  File "/tmp/test1/fhir_bundle_creator/venv/lib/python3.10/site-packages/fhir/resources/core/fhirabstractmodel.py", line 105, in __init__
    BaseModel.__init__(__pydantic_self__, **data)
  File "/tmp/test1/fhir_bundle_creator/venv/lib/python3.10/site-packages/pydantic/v1/main.py", line 341, in __init__
    raise validation_error
pydantic.v1.error_wrappers.ValidationError: 1 validation error for Bundle
__root__ -> type
  field required (type=value_error.missing)
Now, we got an error caused by a wrong way of initialization of the Bundle class from the fhir.resources library. This is how to fix it:
nano fhir_bundle_creator.py
-         bundle = Bundle()
+         bundle_data = {
+             "type": "collection",
+             "entry": []
+         }
+         bundle = Bundle(**bundle_data)
Let’s try to execute the module again:
python main.py
Great, no errors! The code create by the LLM generates a JSON file in the current directory with the data converted from the raw data in CSV:
cat fhir_bundle.json
{
    "resourceType": "Bundle",
    "type": "collection",
    "entry": [
        {"resource": {"resourceType": "Patient", "id": "1", "name": [{"family": "John Doe"}]}},
        {"resource": {"resourceType": "Patient", "id": "2", "name": [{"family": "Jane Smith"}]}},
        {"resource": {"resourceType": "Patient", "id": "3", "name": [{"family": "Michael Johnson"}]}},
        {"resource": {"resourceType": "Patient", "id": "4", "name": [{"family": "Emily Williams"}]}},
        {"resource": {"resourceType": "Patient", "id": "5", "name": [{"family": "David Brown"}]}}
    ]
}
As you can see these are the patients in the original CSV converted into FHIR, as requested to the LLM.
Let’s use IRIS to ingest this JSON and make it available to other applications.
First, let’s check how many Patients there are in the IRIS FHIR database:
curl -X GET http://localhost:${port:-52773}/fhir/r4/Patient?_summary=count
{{"resourceType":"Bundle","id":"af37a1f4-bdeb-11ee-92dc-0242ac1d0002","type":"searchset","timestamp":"2024-01-28T14:44:04Z","total":6,"link":[{"relation":"self","url":"http://localhost:32783/fhir/r4/Patient?_summary=count"}]}
There are 6 patients already in the IRIS FHIR database.
Now, let’s ingest the JSON in the IRIS FHIR database:
payload='{
    "resourceType": "Bundle",
    "type": "collection",
    "entry": [
        {"resource": {"resourceType": "Patient", "id": "1", "name": [{"family": "John Doe"}]}},
        {"resource": {"resourceType": "Patient", "id": "2", "name": [{"family": "Jane Smith"}]}},
        {"resource": {"resourceType": "Patient", "id": "3", "name": [{"family": "Michael Johnson"}]}},
        {"resource": {"resourceType": "Patient", "id": "4", "name": [{"family": "Emily Williams"}]}},
        {"resource": {"resourceType": "Patient", "id": "5", "name": [{"family": "David Brown"}]}}
    ]
}'
curl -X POST http://localhost:${port:-52773}/fhir/r4/ \
    -u "_system:SYS" \
    -H "Content-Type: application/fhir+json;charset=utf-8" \
    --data-binary "$payload"
{"resourceType":"OperationOutcome","issue":[{"severity":"error","code":"invalid","diagnostics":"InvalidBundleTypeForTransaction","details":{"text":"The provided bundle type, collection, is not allowed for a Transaction interaction."}}]}
The error was generated because the Bundle resource type setup - collection, is not allowed for a Transaction interaction. So we need to change the Bundle resource type to transaction. Futhermore, we also have to add request property to each entry, like this:
payload='{
    "resourceType": "Bundle",
    "type": "transaction",
    "entry": [
        {"request": {"method": "POST", "url": "Patient"}, "resource": {"resourceType": "Patient", "id": "1", "name": [{"family": "John Doe"}]}},
        {"request": {"method": "POST", "url": "Patient"}, "resource": {"resourceType": "Patient", "id": "2", "name": [{"family": "Jane Smith"}]}},
        {"request": {"method": "POST", "url": "Patient"}, "resource": {"resourceType": "Patient", "id": "3", "name": [{"family": "Michael Johnson"}]}},
        {"request": {"method": "POST", "url": "Patient"}, "resource": {"resourceType": "Patient", "id": "4", "name": [{"family": "Emily Williams"}]}},
        {"request": {"method": "POST", "url": "Patient"}, "resource": {"resourceType": "Patient", "id": "5", "name": [{"family": "David Brown"}]}}
    ]
}'
curl -X POST http://localhost:${port:-52773}/fhir/r4/ \
    -u "_system:SYS" \
    -H "Content-Type: application/fhir+json;charset=utf-8" \
    --data-binary "$payload"
{
    "resourceType":"Bundle",
    "id":"b9f55591-bded-11ee-92dc-0242ac1d0002",
    "type":"transaction-response",
    "timestamp":"2024-01-28T14:58:41Z",
    "entry":[
        {"response":{"status":"201","location":"http://localhost:32783/fhir/r4/Patient/2228","etag":"W/\"1\"","lastModified":"2024-01-28T14:58:42Z"}},
        {"response":{"status":"201","location":"http://localhost:32783/fhir/r4/Patient/2229","etag":"W/\"1\"","lastModified":"2024-01-28T14:58:42Z"}},
        {"response":{"status":"201","location":"http://localhost:32783/fhir/r4/Patient/2230","etag":"W/\"1\"","lastModified":"2024-01-28T14:58:42Z"}},
        {"response":{"status":"201","location":"http://localhost:32783/fhir/r4/Patient/2231","etag":"W/\"1\"","lastModified":"2024-01-28T14:58:42Z"}},
        {"response":{"status":"201","location":"http://localhost:32783/fhir/r4/Patient/2232","etag":"W/\"1\"","lastModified":"2024-01-28T14:58:42Z"}}
    ]
}
Finally, let’s check how many Patients there are now in the IRIS FHIR database:
curl -X GET http://localhost:${port:-52773}/fhir/r4/Patient?_summary=count
{"resourceType":"Bundle","id":"c3f4e1ed-bded-11ee-92dc-0242ac1d0002","type":"searchset","timestamp":"2024-01-28T14:58:58Z","total":11,"link":[{"relation":"self","url":"http://localhost:32783/fhir/r4/Patient?_summary=count"}]}
As you can see, now there are 11 patients as expected - the 6 already presented plus the 5 new one inserted in the transaction.
Setting an Interoperability Production from the generated code
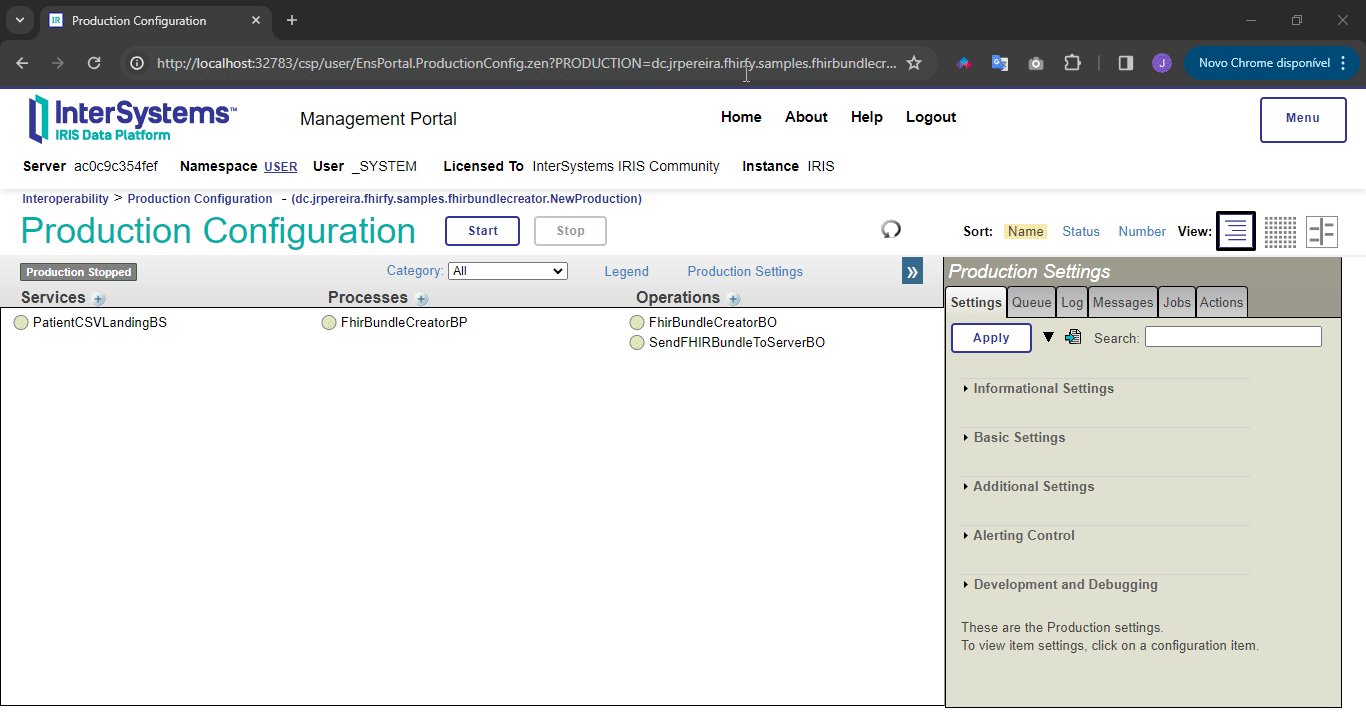
Now that you have a working CSV to FHIR converter, you can use it to create an IRIS Interoperability Production. You can open it here.
In this example, we will setup a simple production which seeks for csv files into the /tmp directory, sends them to be converted into FHIR by the code previous generated by FHIRFy, and finally ingests them in the IRIS FHIR database using the IRIS for Health FHIR API.
The source code of the production and all of its components can be found in the here.
Here is a picture of the production and a description of its components:
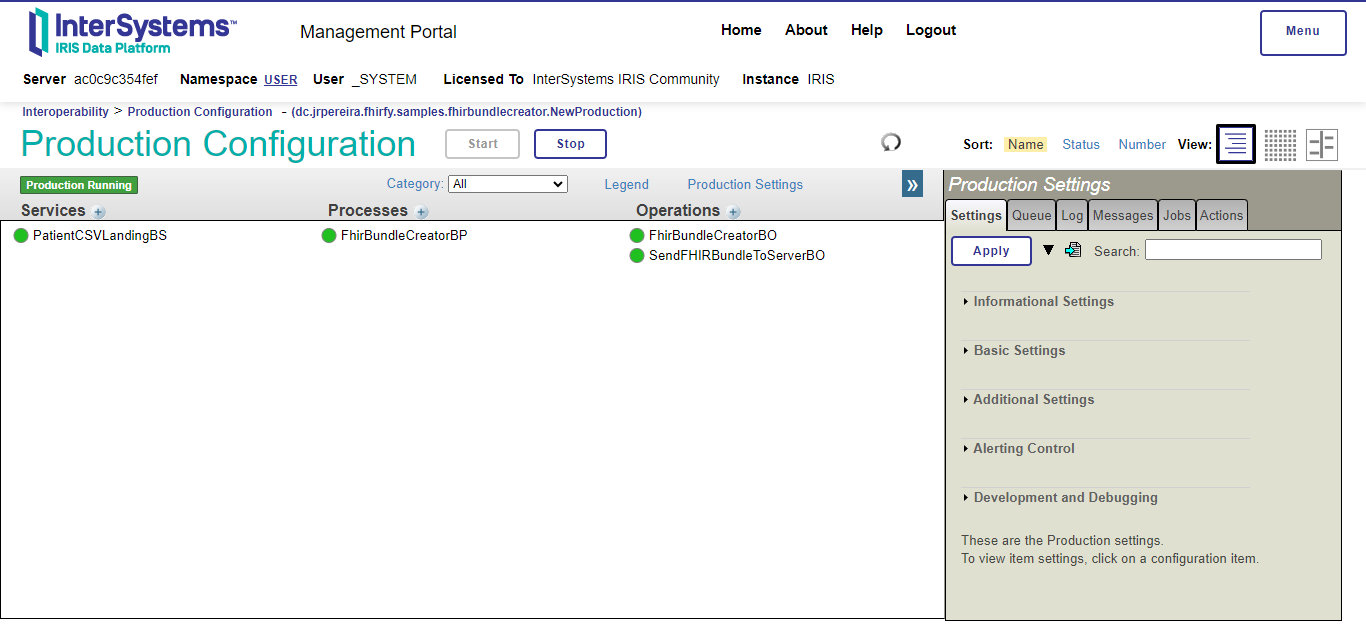
- PatientCSVLandingBS: Business Service which receives the CSV files from the
/tmpdirectory. Uses the BSEnsLib.File.PassthroughService - FhirBundleCreatorBP: Business Process which receives the CSV files and orchestrates the conversion of them into FHIR.
- FhirBundleCreatorBO: Custom Business Operation which uses the FHIR converter generated by FHIRFy to convert the CSV files into FHIR.
- SendFHIRBundleToServerBO: Business Operation which sends the FHIR bundles to the FHIR server. Uses the BO
EnsLib.REST.GenericOperation
The Business Operator FhirBundleCreatorBO uses the method FhirBundleCreator() located in the class dc.jrpereira.fhirfy.samples.fhirbundlecreator.Main. The source code of this method is basic the code generated by the FHIRFy in the file main.py, adapted to be embedded in a ObjectScript class, using Embedded Python:
- from data_parser import DataParser
- from fhir_bundle_creator import FHIRBundleCreator
-
- def main():
+ Class dc.jrpereira.fhirfy.samples.fhirbundlecreator.Main Extends %RegisteredObject
+ {
+
+ Method FhirBundleCreator(csvFile As %String) As %String [ Language = python ]
+ {
+ import sys
+ import os
+ import uuid
+
+ # Add the path to the Python script
+ sys.path.append("/home/irisowner/dev/python/fhir_bundle_creator")
+
+ # Validate a valid csv file name was provided
+ if not csvFile or not os.path.isfile(csvFile):
+ raise Exception("Please provide a valid csv file")
+
+ # Import the modules generated by FHIRfy to convert a CSV to a FHIR Bundle
+ from data_parser import DataParser
+ from fhir_bundle_creator import FHIRBundleCreator
# Parse the raw data
data_parser = DataParser()
- patient_data = data_parser.parse_data('data.csv')
+ patient_data = data_parser.parse_data(csvFile)
# Create a FHIR Bundle resource
fhir_bundle_creator = FHIRBundleCreator()
fhir_bundle = fhir_bundle_creator.create_fhir_bundle(patient_data)
# Save the FHIR Bundle resource to a file
-
with open('fhir_bundle.json', 'w') as f:
f.write(fhir_bundle.json())
-
if name == 'main':
-
main()
-
# Return the FHIR Bundle filename -
return fhir_bundle_filename - }
}
The whole source code generated by the FHIRFy project was extracted to the directory /home/irisowner/dev/python/fhir_bundle_creator. This is the reason of the line sys.path.append("/home/irisowner/dev/python/fhir_bundle_creator") in the Main.cls class.
Note that the main modules - data_parser.py and fhir_bundle_creator.py are used without any modification.
The following is a video showing a walkthrough of the production:
Web Application
If you want to try the project but with no need to handle REST API calls, you use the Web Application.
The Web Application is available at this link.
Mock Data

If you don’t have real data, you can choose the “Use Mock Data” option for a sample analysis.
Theme

Toggle between light and dark themes using the theme switcher located in the top-right corner.
Usage

- Enter your raw data in Markdown format into the provided textarea.

- Click the “Analyse it!” button to receive an analysis report.

- To suggest a solution based on the analysis, click “Suggest Implementation.”

- Generate code for a chosen solution by clicking “Generate Code.”

- To download the generated code, click the provided link in the response.
Error Handling
If there’s an error during analysis or suggestion, an error message will be displayed above the response.
Visual Studio Code Extension
A last way to use the project is to use the Visual Studio Code extension.
That way is handy due as it is likely you’ll need to do some adjusts to the generated module, you are already inside VS Code.
https://github.com/jrpereirajr/iris-fhirfy/assets/6039/e4599a8d-24c1-4365-81f2-22ee63bbb987
Installation
-
Open Visual Studio Code and navigate to the Extensions tab.
-
In the Extensions tab, open the options menu and select Install from VSIX.
In the file picker dialog that opens, navigate to the project root and select the VSIX file. -
Install the extension by clicking the install button.
-
Configure the FHIRfy Analyzer server settings in your Visual Studio Code settings:
fhirfyAnalyzer.host: The host for the FHIRfy Analyzer server.fhirfyAnalyzer.port: The port for the FHIRfy Analyzer server.fhirfyAnalyzer.username: The username for the FHIRfy Analyzer server.fhirfyAnalyzer.password: The password for the FHIRfy Analyzer server.
-
Use the
ctrl+alt+f(orcmd+alt+fon macOS) keyboard shortcut or find the “FHIRfy Analyzer: Show” command to open the extension. -
Enjoy analyzing FHIR data directly within Visual Studio Code!
Limitations
This project is currently in an experimental phase, and as such, it is expected to produce incorrect or unusual results. Our primary objective at this stage is to test the fundamental concept of harnessing the capabilities of LLMs to assist developers in converting generic healthcare data into the FHIR standard.
It’s worth noting that we have only worked with very basic and straightforward structured data thus far.
While expecting code to convert unstructured generic healthcare data, such as clinical notes, may be a challenging endeavor, the technical analysis report provided by the tool can still be valuable for developers seeking to understand the data they are working with.
Furthermore, it’s important to emphasize that certain critical topics, such as data privacy and security, are not addressed within the scope of this project. These areas must be addressed in future research and development.
Future work
- Create metrics for test performance on differents LLM providers and/or aproaches
- Train a PPI model to alert possible PPI leaks in healthcare sample data sent to LLMs providers
- Try frameworks like langchain, llamaindex and crew.ia
- Try multimodel LLMs - image and audio as input
Dream team
Made with
Install
 zpm install iris-fhirfy
  download archive
 Version
1.0.103 Feb, 2024
ObjectScript quality test
 PassedView report
Category
Works with
InterSystems IRISInterSystems IRIS for HealthFirst published
25 Jan, 2024Last edited
03 Feb, 2024