


© 2026 InterSystems Corporation, Cambridge, MA. All rights reserved.Privacy & TermsGuaranteeSection 508Contest Terms

iris-oauth-fhir 

0
0 reviews
0
Awards
281
Views
0
IPM installs
 2
2 2
2
Details
Releases (1)
Reviews
Issues
Articles (1)
Fhir Oauth Sample
What's new in this version
Initial Release
iris-oauth-fhir

![]()
This is a sample application that demonstrates how to use the InterSystems IRIS for Health FHIR Repository to build a FHIR Repository with OAuth2 authorization, the FHIR endpoint will be the resource server and Google OpenId will be the authorization server.
Prerequisites
- Docker
- Git
- Google Cloud Platform account
Installation
Setup Google Cloud Platform
This part is inspired by the article Adding Google Social Login into InterSystems Management Portal from yurimarx Marx in the InterSystems Community.
-
Create a new project in Google Cloud Platform
-
On the header click Select a project:
- Click the button NEW PROJECT:
- Create a sample project for this article called InterSystemsIRIS and click the button CREATE:
- Go to the Header again and select the created project InterSystemsIRIS hyperlink in the table:
- Now the selected project is the working one:
- In the header look for credentials on the Search field and choose API credentials (third option for this image):
- On the top of the screen, click the + CREATE CREDENTIALS button and select OAuth 2.0 Client ID option:
- Now click CONFIGURE CONSENT SCREEN:
- Choose External (any person who has Gmail is able to use it) and click the CREATE button:
- In Edit app registration, complete the field values as follow:
App Information (use your email for user support email):

- For Authorized domains, it is not necessary to set anything because this sample will use localhost. Set the developer contact information with your email and click the SAVE AND CONTINUE button:

- Click ADD OR REMOVE SCOPES and select the following scopes, scroll the dialog, and click the UPDATE button:

- Include your email into the Test users list (using the +ADD USERS button) and click the SAVE AND CONTINUE button:

- The wizard shows you the Summary of the filled fields. Scroll the screen and click the BACK TO DASHBOARD button.
- Now, it is time to configure the credentials for this new project. Select the option Credentials:
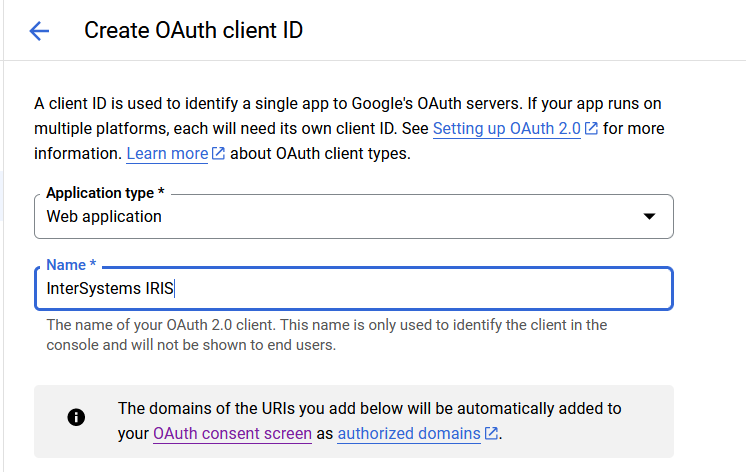
- Click the + CREATE CREDENTIALS button and select OAuth client ID option:
- Select Web application option and complete the field values as follow:

We will be using postman for the demo, but if you want to use the sample application, you will need to add the following redirect URIs, same goes for the JavaScript origins.
- Click the CREATE button and copy the Client ID and Client Secret values:

You are done with the Google Cloud Platform configuration.
Setup the sample application
- Clone this repository:
git clone https://github.com/grongierisc/iris-oauth-fhir
- Build the docker image:
docker-compose build
- Set Client Id an Client Secret from the last part of (Setup Google Cloud Platform) in a new file called
secret.jsoninmisc/authfolder, you can use thesecret.json.templateas a template.
{
    "web": {
        "client_id": "xxxx",
        "project_id": "intersystems-iris-fhir",
        "auth_uri": "https://accounts.google.com/o/oauth2/auth",
        "token_uri": "https://oauth2.googleapis.com/token",
        "auth_provider_x509_cert_url": "https://www.googleapis.com/oauth2/v3/certs",
        "client_secret": "xxxx"
    },
    "other" : {
        "issuer" : "accounts.google.com"
    }
}
⚠️ Warning : auth_provider_x509_cert_url by default is https://www.googleapis.com/oauth2/v1/certs but it is deprecated, you need to use https://www.googleapis.com/oauth2/v3/certs instead.
- Run the docker image:
docker-compose up -d
⚠️ Warning : if the secret.json file is not present, the docker image will start in a unauthenticated mode.
Test it with Postman
The endpoint is httsp://localhost:4443/fhir/r4/.
-
Configure Postman to use the self-signed certificate, see Postman documentation.
-
Create a new request in Postman and go to the Authorization tab. Select OAuth 2.0 as the type :

- On the Configure New Token dialog, set the following values:
The access url token is : https://accounts.google.com/o/oauth2/token
Scopes is : openid
Client Id and Client Secret are the one you got from the Google Cloud Platform.

- Click the Request Token button and you will be redirected to the Google login page:


- Make use of the token to get the patient list:

- Select in Token type, ID Token or Access Token and click the Use Token button:

- You will get the patient list:

What journey, hope you enjoyed it.
More to come, stay tuned. We will be dealing with kubernetes and the FHIR repository in the next part.
Made with
Version
1.0.021 Jul, 2023
Category
Works with
InterSystems IRIS for HealthFirst published
21 Jul, 2023Last edited
21 Jul, 2023