© 2026 InterSystems Corporation, Cambridge, MA. All rights reserved.Privacy & TermsGuaranteeSection 508Contest Terms

ha-iris-k8s 

0
0 reviews
0
Awards
608
Views
0
IPM installs
 0
0 0
0
Details
Releases (3)
Reviews
Issues
Articles (2)
Highly available IRIS deployment on Kubernetes without mirroring
What's new in this version
Updated Readme, fixed images
Highly available IRIS deployment on Kubernetes without mirroring
Check out extented article at InterSystems Development Community
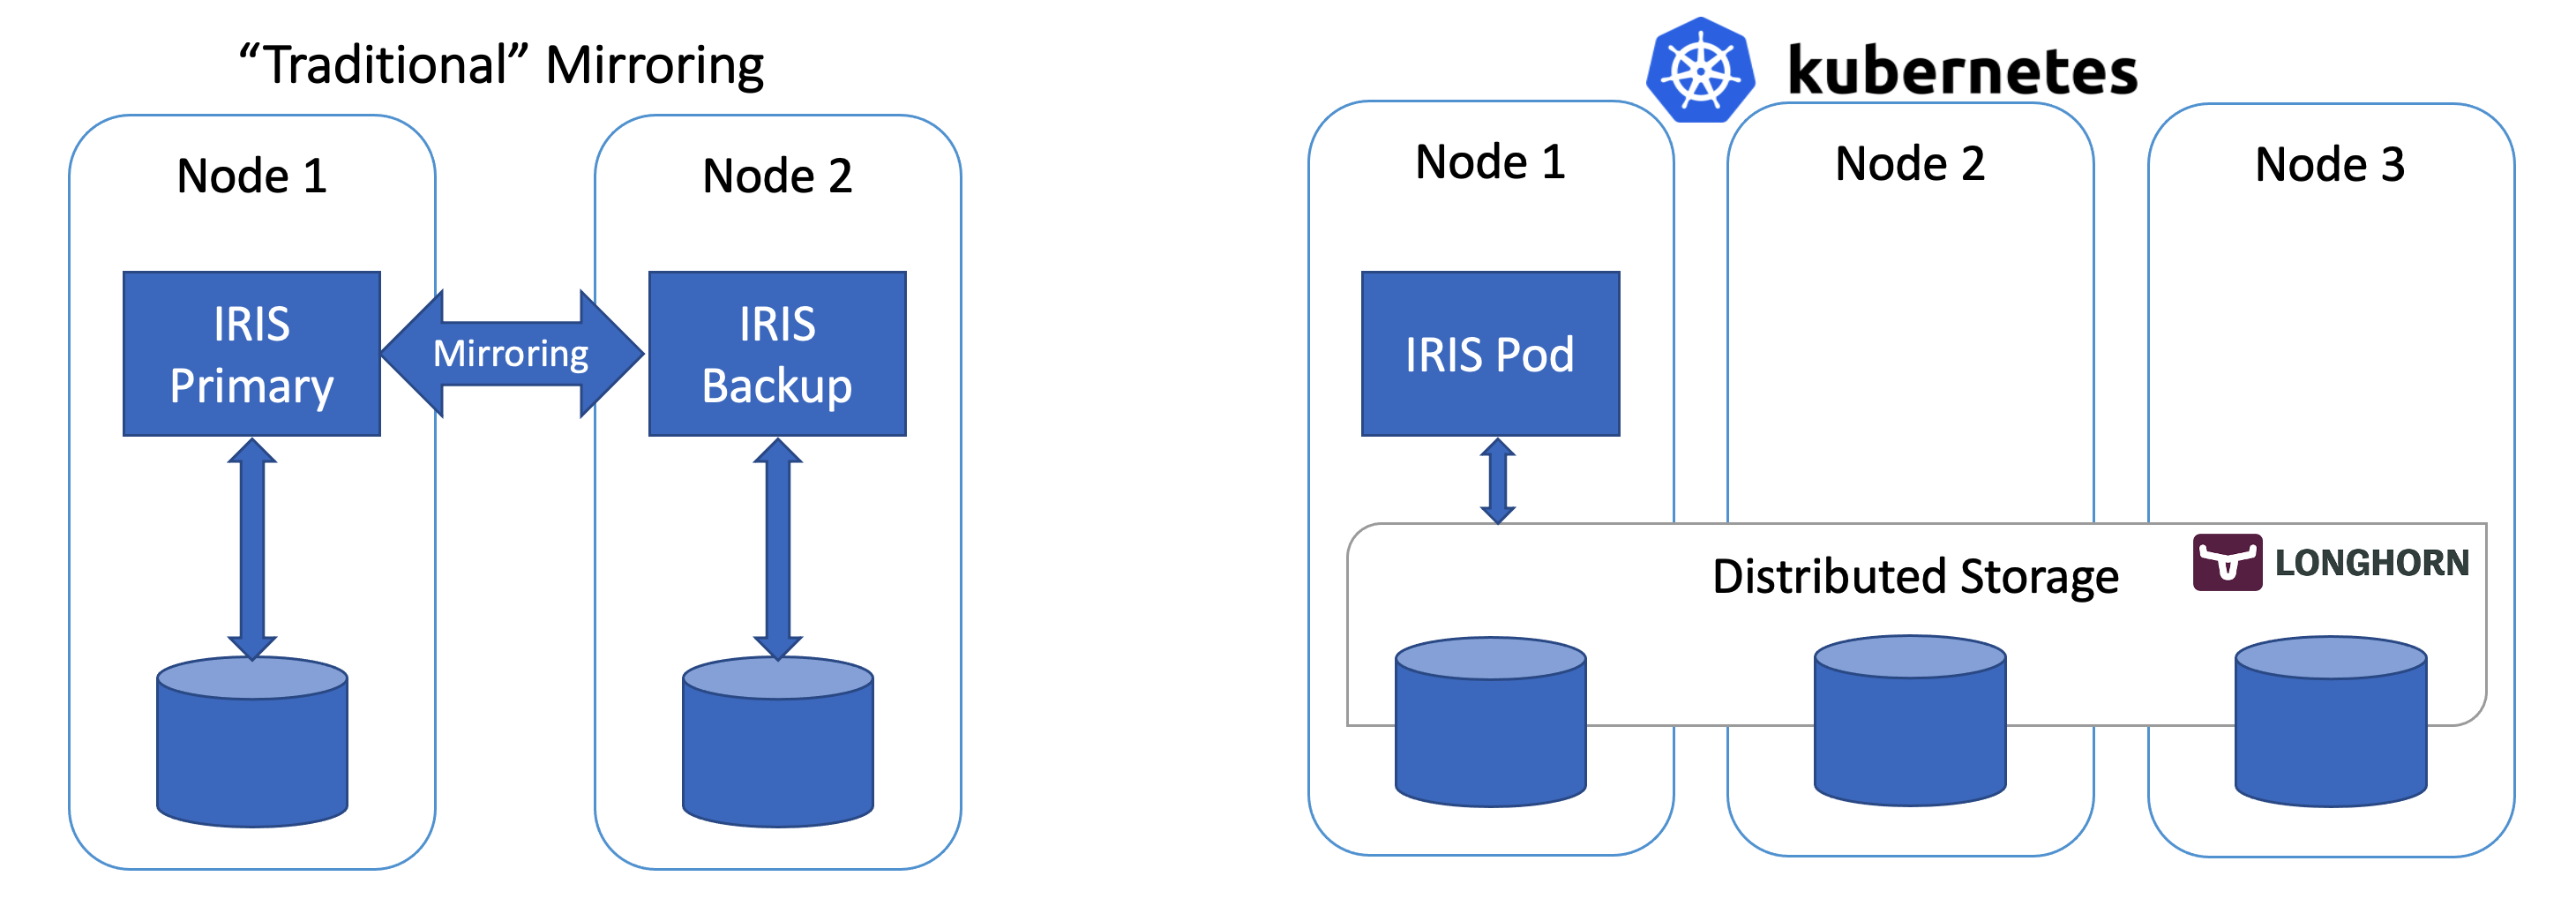
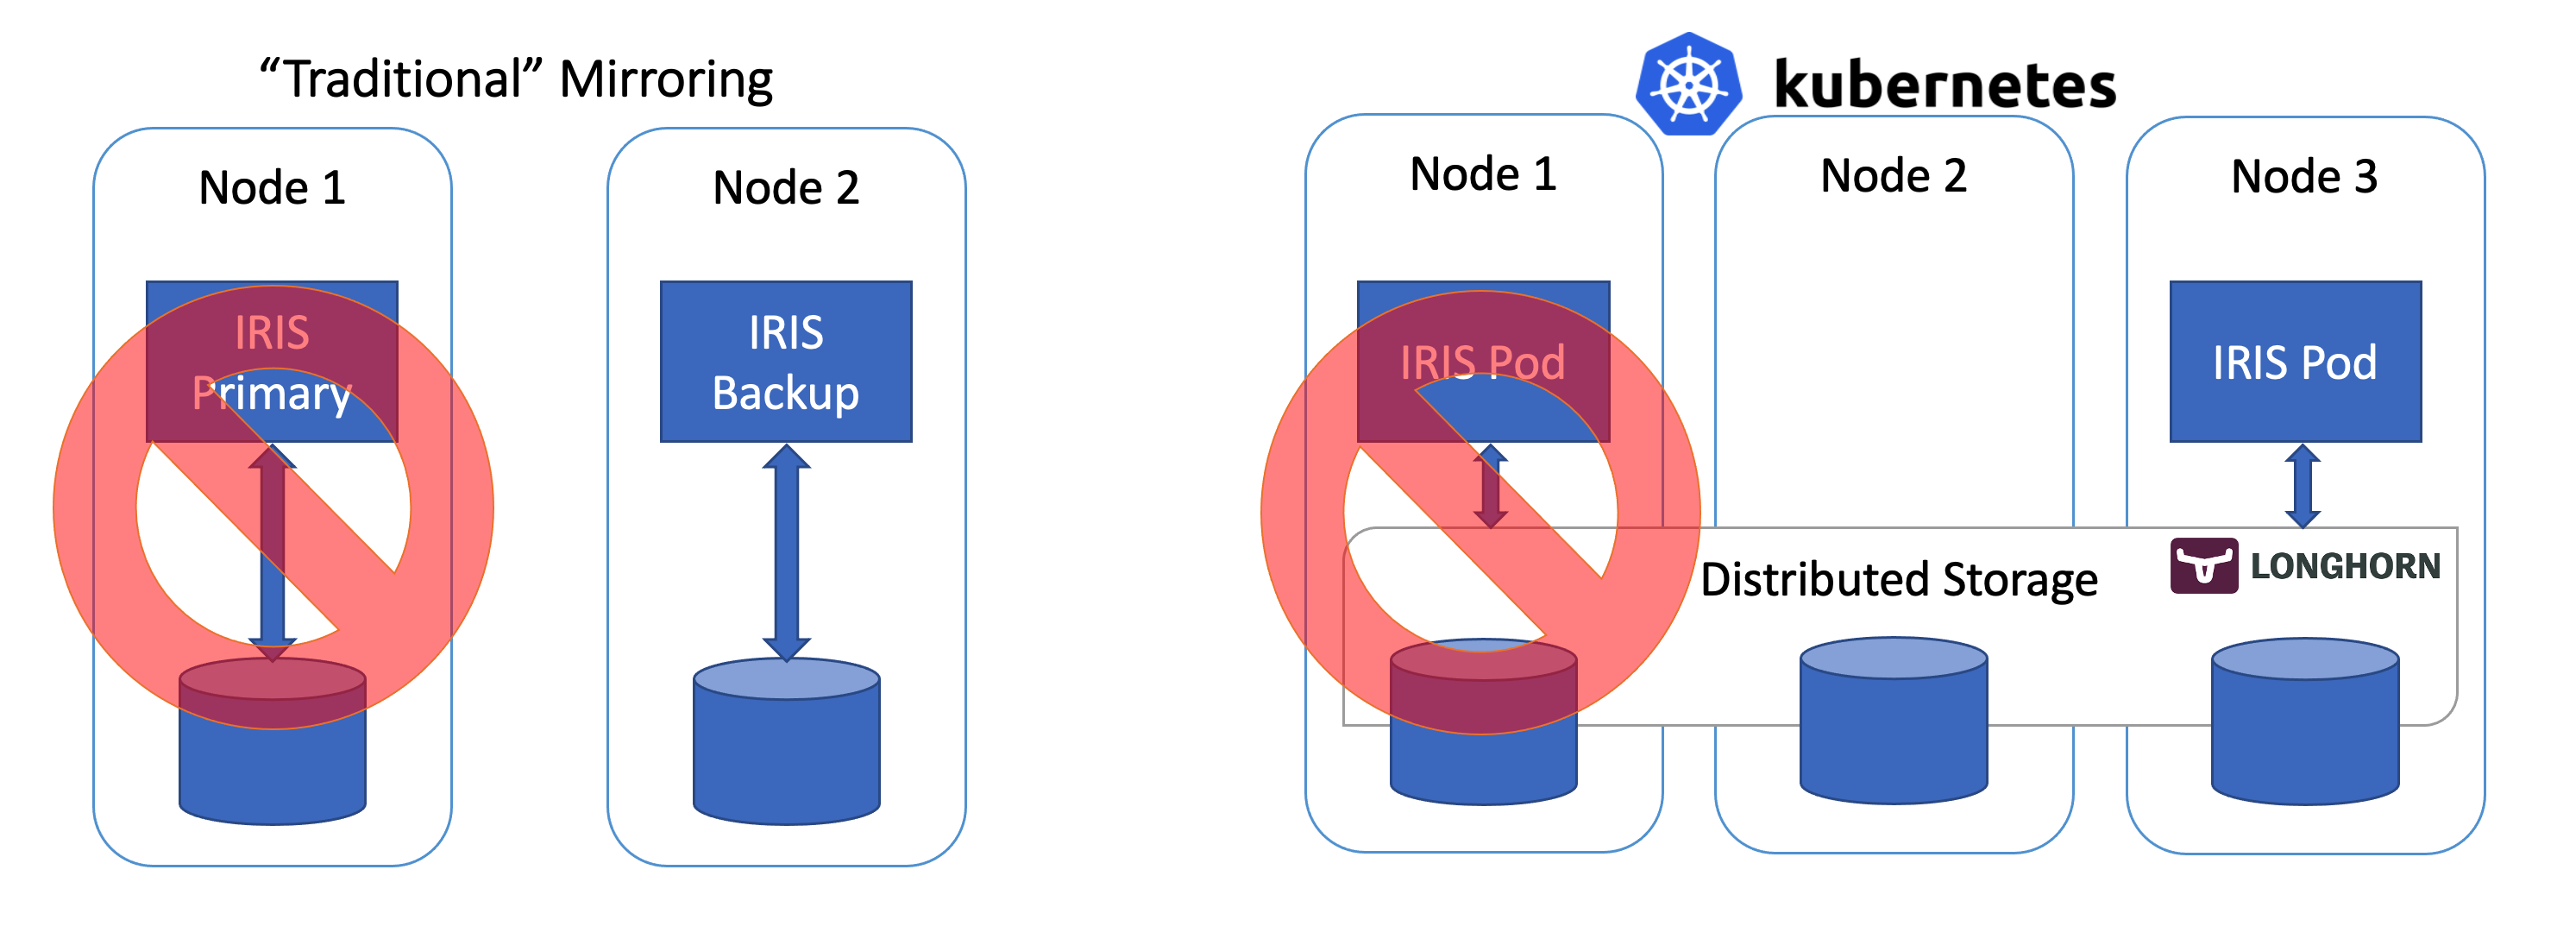
This repo allows you to create highly - available IRIS deployment that is capable of sustaining pod, node and availability zone failure. Instead of traditional IRIS mirroring it relies on the distributed highly available storage (Longhorn project is used as an example) and Kubernetes deployment replicas to keep the IRIS up and running at all times.

Getting Started
Install Longhorn (distributed highly-available storage CSI for K8s) and IRIS deployment
kubectl apply -f https://raw.githubusercontent.com/longhorn/longhorn/master/deploy/longhorn.yaml
kubectl apply -f https://github.com/antonum/ha-iris-k8s/raw/main/tldr.yaml
First kubectl apply installs Longhorn - open source distributed Kubernetes storage engine that would allow our system to tolerate failure of individual disks, nodes and even entire Availability Zone, without involving mirroring. Second one would install InterSystems IRIS deployment, using Longhorn storage for Durable SYS as well as associated volume claim and service, exposing IRIS to the outside world. Deployment would take care of things like failure of the individual IRIS container.
Wait for all the pods turn to the Running state
kubectl get pods -A
If some pods in the longhorn-system namespace are not coming up after few minutes - check the Longhorn troubleshooting section below.
Identify pod name for IRIS deployment public IP of the ‘iris-svc’ service and node, running the IRIS pod.
kubectl get pods -o wide
NAME                    READY   STATUS    RESTARTS   AGE     IP            NODE                                NOMINATED NODE   READINESS GATES
iris-6d8896d584-8lzn5   1/1     Running   0          4m23s   10.244.0.35   aks-agentpool-29845772-vmss000001   <none>           <none>
kubectl get svc
NAME         TYPE           CLUSTER-IP    EXTERNAL-IP    PORT(S)           AGE
iris-svc     LoadBalancer   10.0.219.94   40.88.18.182   52773:30056/TCP   6m3s
kubernetes   ClusterIP      10.0.0.1      <none>         443/TCP           6d9h
Access IRIS Management portal at: http://40.88.18.182:52773/csp/sys/%25CSP.Portal.Home.zen - default password is ‘SYS’. See below “Zombies and other stuff” on overriding it.
Simulate the Failure
Now start messing around. But before we do it - try to add some data into the database and make sure it’s there when IRIS is back online.

kubectl exec -it iris-6d8896d584-8lzn5 -- iris session iris
USER>set ^k8stest($i(^k8stest))=$zdt($h)_" running on "_$system.INetInfo.LocalHostName()
USER>zw ^k8stest
^k8stest=1
^k8stest(1)="01/14/2021 14:13:19 running on iris-6d8896d584-8lzn5"
Now let’s do what is sometimes described with the fancy term - “chaos engineering”:
# Stop IRIS - Container will be restarted automatically kubectl exec -it iris-6d8896d584-8lzn5 -- iris stop iris quietlyDelete the pod - Pod will be recreated
kubectl delete pod iris-6d8896d584-8lzn5
"force drain" the node, serving the iris pod - Pod would be recreated on another node
kubectl drain aks-agentpool-29845772-vmss000001 --delete-local-data --ignore-daemonsets
Delete the node - Pod would be recreated on another node
well... you can't really do it with kubectl. Find that instance or VM and KILL it.
if you have access to the machine - turn off the power or disconnect the network cable. Seriously!
In all cases IRIS would be back online with all the data fairly soon.
Interacting with Deployment
IRIS Management portal is avaliable via iris-svc service, that exposes port 52773 of IRIS to the internet.
kubectl get svc
NAME         TYPE           CLUSTER-IP    EXTERNAL-IP    PORT(S)           AGE
iris-svc     LoadBalancer   10.0.219.94   40.88.18.182   52773:30056/TCP   6m3s
kubernetes   ClusterIP      10.0.0.1      <none>         443/TCP           6d9h
Access IRIS Management portal at: http://40.88.18.182:52773/csp/sys/%25CSP.Portal.Home.zen
Alternatevely you can use kubectl port forwarding to access IRIS without the service.
kubectl get pods
NAME                    READY   STATUS    RESTARTS   AGE
iris-6d8896d584-dk8h4   1/1     Running   0          3h13m
kubectl port-forward iris-6d8896d584-dk8h4 52773:52773
That would make management portal avaliable locally at the http://localhost:52773/csp/sys/%25CSP.Portal.Home.zen
Accessing command prompt
kubectl exec -it iris-7cccfd7cd7-hrwqj -- bash
iris session iris
USER>
Examining the Components
tldr.yaml is just a collection of kubernetes resources that can be used to deploy “all in one” solution. Individual resources are described in this section.
iris-pvc.yaml
Persistent volume claim. This is what IRIS would use to store all the data that needs to survive the outage. Nature of this storage defines the kinds of the outage deployment is able to handle. Non - distributed container storage (default for most of the cloud-provided managed kubernetes implemetation) require that failed pod must be restarted on the same node where it was initially launched, reducing number of outage scenarios deployment can successfully recover from.
In this repo we use “longhorn” volume type. Longhorn here acts as an example of distributed block storage for Kubernetes. It’s free, open source and very easy to install. Feel free to try any other distributed k8s storage you’ll see fit. StorageOS, Portworx, OpenEBS are examples of open source and/or freemium solutions. Enterprise storage options like NetApp and PureStorage are on the higher end of the spectrum here too.
iris-deployment.yaml
IRIS Deployment. It manages one and exactly one replica of the pod, running IRIS container. So if by any reason IRIS pod is down, kubernetes would automatically try to launch new instance of the pod, mounting the same volume.
Durable SYS - ISC_DATA_DIRECTORY variable defines the mount point where IRIS would store all the data that needs to survive pod restart. Corresponding iris-external-sys volume mount refers to the Persistent Volume Claim, defined in the iris-pvc.yaml file. Read more on the Durable SYSY feature of IRIS here: https://docs.intersystems.com/irisforhealthlatest/csp/docbook/DocBook.UI.Page.cls?KEY=ADOCK#ADOCK_iris_durable
CPF Merge - Optional component, allowing you to define configuration that would be added to the iris.cpf file upon the system start. ISC_CPF_MERGE_FILE variable defines the location of the file, to be used in merge. In the provided example we set global buffers and gmheap value via the ConfigMap, defined in the iris-cpf-merge.yaml file.
Liveness Probe - optional. Checks if IRIS instance is running inside the container. Kubernetes will restart the container if probe is failing. You might need to adjust initialDelaySeconds field to allow IRIS more time to reach the “running” state.
iris-cpf-merge.yaml
ConfigMap, defining the content of CPF Merge file merge.cpf that IRIS Deployment mounts at /external/merge mount point. For more information of the CPF MErge functionality see: https://docs.intersystems.com/irisforhealthlatest/csp/docbook/DocBook.UI.Page.cls?KEY=RACS_cpf#RACS_cpf_edit_merge
If you deside to skip this item, make sure to also remove corresponding entries in the iris-deployment.yaml.
iris-svc.yaml
Optional kubernetes LoadBalancer service.
kubectl get svc
NAME         TYPE           CLUSTER-IP    EXTERNAL-IP    PORT(S)           AGE
iris-svc     LoadBalancer   10.0.219.94   40.88.18.182   52773:30056/TCP   6m3s
kubernetes   ClusterIP      10.0.0.1      <none>         443/TCP           6d9h
Access IRIS Management portal at: http://40.88.18.182:52773/csp/sys/%25CSP.Portal.Home.zen
Storage Scaling and Backup
To increase the size of the IRIS volume - adjust storage request in persistent volume claim (file iris-pvc.yaml), used by IRIS.
...
  resources:
    requests:
      storage: 10Gi #change this value to required
and re-apply the pvc specificatin.
kubectl apply -f iris-pvc.yaml
How soon and under what condition the volume space would be extended, depends on the storage driver implementation. For longhorn it takes few minutes, but requires PVC to be disconnected from the pod. So basically you’ll need to stop the deployment, before the change would take effect.
Besides high availability, most of the kubernetes container storage solutions provide convinient options for the backup, snapshots and restore. Details are implementation - specific, but the common convention is that backup is associated with VolumeSnapshot. It is so for Longhorn.
iris-volume-snapshot.yaml is the example of such volume snapshot. Before using it you need to configure backups to either S3 bucket or NFS volume in Longhorn. https://longhorn.io/docs/1.0.1/snapshots-and-backups/backup-and-restore/set-backup-target/
Longhorn provides web - based UI for configuring and managing volumes.
Identify the pod, running longhorn-ui component and establish port forwarding with kubectl:
kubectl -n longhorn-system get pods
# note the longhorn-ui pod id.
kubectl port-forward longhorn-ui-df95bdf85-gpnjv 9000:8000 -n longhorn-system
Longhorn UI will be avaliable at http://localhost:9000
# Take crash-consistent backup of the iris volume
kubectl apply -f iris-volume-snapshot.yaml
For IRIS it is recommended that you execute External Freeze before taking the backup/snapshot and Thaw after. See details here: https://docs.intersystems.com/irisforhealthlatest/csp/documatic/%25CSP.Documatic.cls?LIBRARY=%25SYS&CLASSNAME=Backup.General#ExternalFreeze
Longhorn Troubleshooting and Alternatives
IRIS deployment is using Longhorn via Persistent Volume Claim iris-pvc.yaml. If you want to change it to some other Storage Class - just change this line in ‘iris-pvc.yaml’ or ‘tldr.yaml’ to another Storage Class you have.
spec:
  storageClassName: longhorn
If you’ll just comment this line - it would use storage class, currently defined as “default”. To get the list of the storage classes on your cluster use kubectl get sc:
kubectl get sc
NAME                             PROVISIONER                     RECLAIMPOLICY   VOLUMEBINDINGMODE   ALLOWVOLUMEEXPANSION   AGE
azurefile                        kubernetes.io/azure-file        Delete          Immediate           true                   6d20h
azurefile-premium                kubernetes.io/azure-file        Delete          Immediate           true                   6d20h
default (default)                kubernetes.io/azure-disk        Delete          Immediate           true                   6d20h
longhorn                         driver.longhorn.io              Delete          Immediate           true                   6d20h
managed-premium                  kubernetes.io/azure-disk        Delete          Immediate           true                   6d20h
For Longhorn you need three worker nodes in the cluster and open-iscsi installed on the nodes. Other prerequisites are documented here: https://longhorn.io/docs/1.1.0/deploy/install/#installation-requirements
Default installation of Azure AKS known to work with Longhorn out of the box. AWS EKS might need additional step of installing open-iscsi on the nodes https://longhorn.io/docs/1.1.0/deploy/install/#installing-open-iscsi. GKE requires additional step, documented here: https://longhorn.io/docs/1.1.0/advanced-resources/os-distro-specific/csi-on-gke/
Beware of Zombies and Other Stuff
If you are familiar with running IRIS in the Docker containers, you might have used the --init flag.
docker run --rm -p 52773:52773 --init --name iris store/intersystems/iris-community:2020.4.0.524.0
The goal of this flag is to prevent formation of the “zombie processes”. Unfortunatly there is no such flag in Kubernetes. As an alternative, in your own containers you can use tini in your Dockerfile as follows:
FROM iris-community:2020.4.0.524.0
...
# Add Tini
USER root
ENV TINI_VERSION v0.19.0
ADD https://github.com/krallin/tini/releases/download/${TINI_VERSION}/tini /tini
RUN chmod +x /tini
USER irisowner
ENTRYPOINT ["/tini", "--", "/iris-main"]
To override default password - you can now use PasswordHash field in the CPF Merge file. Read more at: https://docs.intersystems.com/irisforhealthlatest/csp/docbook/Doc.View.cls?KEY=ADOCK#ADOCK_iris_images_password_auth
Last checked by moderator
14 Nov, 2025Impossible to TestVersion
1.0.222 Jan, 2021
Category
Works with
InterSystems IRISInterSystems IRIS for HealthFirst published
22 Jan, 2021Last edited
22 Jan, 2021