© 2026 InterSystems Corporation, Cambridge, MA. All rights reserved.Privacy & TermsGuaranteeSection 508Contest Terms

simplemirror  Works
Works
Works

5
1 reviews
0
Awards
342
Views
0
IPM installs
 1
1 2
2
Details
Releases (1)
Reviews (1)
Issues
Articles (1)
Super SIMPLE mirroring solution with dockers
What's new in this version
Initial Release
<<<<<<< HEAD
Super SIMPLE docker-compose with mirroring (version 2019.3 and later)
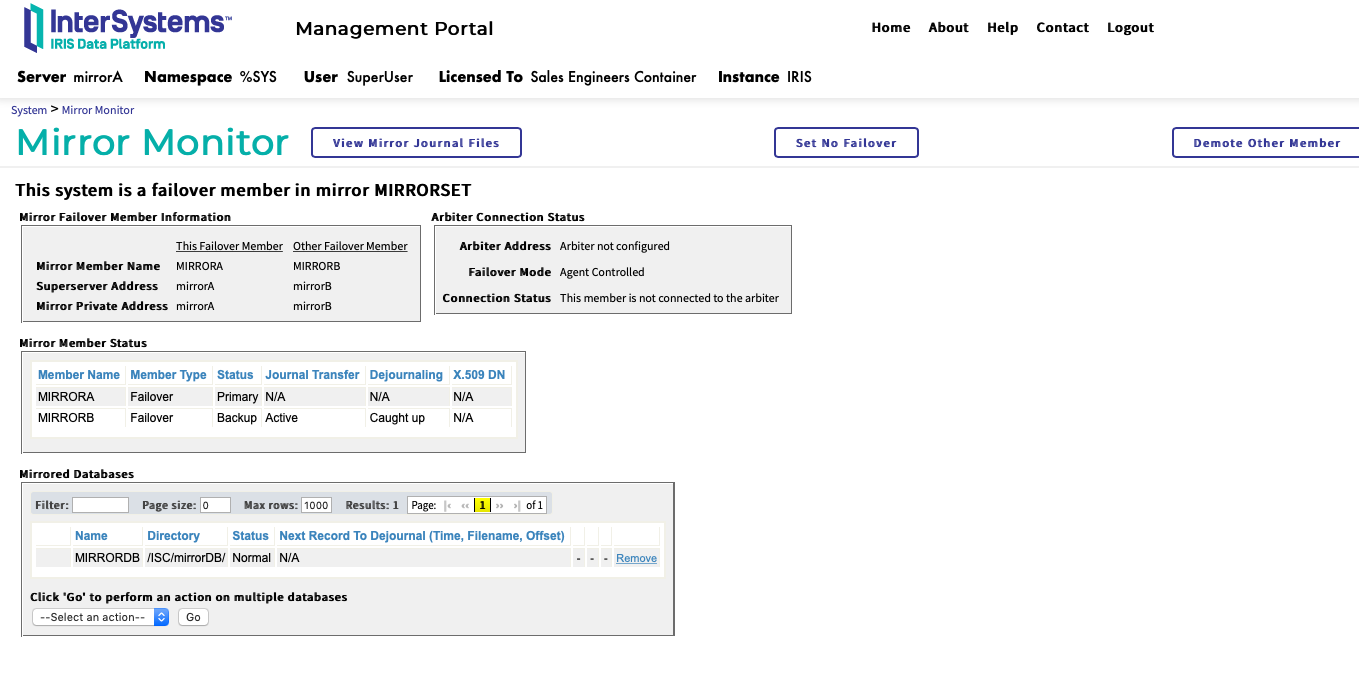
This is a very simple docker-compose with a simple class that creates 2 IRIS instances, in 2 different servers (serverA and serverB), configured in mirror.
Also, it will define de mirror (MIRRORSET) and create 1 new DDBB in each server instance, called MIRRORDB, that will be mirrrored and configured under namespace MIRRORNS.
Requirements
- docker & docker-compose
- IRIS image (or docker repository with IRIS)
- iris.key
How to
Put the iris.key license in ./install directory.
Regarding the Iris docker image, you can either download from Intersystems or use a docker hub repository:
-
Download an image from Intersystems and load the image
Download the version you need from Intersystems and use docker load command to load the image. You will need to have access to wrc.intersystems.com, then go to distributions and find the version you need. I recommend to download 2019.3 and later.
When I was writing this the version “iris-2019.3.0.302.0-docker.tar.gz” was under the preview tag (where you can also get a preview License key)docker load -i iris-2019.3.0.302.0-docker.tar.gz docker-compose up -d -
Or use a docker hub to download the image
If you have a docker hub with images, just change the image inside the docker-compose.yml. For example:
image: containers.intersystems.com/intersystems/iris:2019.3.0-latest
you will need to be logged:
$ docker login containers.intersystems.com
Useful commands
- Start a iris session in servarA (initially is Primary)
docker exec -it serverA iris session iris
- Start a iris shell in serverB (initially Backup)
docker exec -it serverB bash
-
Connect to SMP serverA (Primary initially)
http://127.0.0.1:9092/csp/sys/UtilHome.csp -
Connect to SMP serverB (Backup initially)
http://127.0.0.1:9093/csp/sys/UtilHome.csp
**The first time you login you will need to use default credentials:
- Username: SuperUser
- Password: SYS
=======
目的
オリジナルを元に、クラウド、コンテナ内などVIPを使用しない(動作しない)環境でのミラー構成の例を作成しました。手元で(コストを気にせず)気軽にいろいろと試せる環境の作成を目的にしています。
ミラーを使用するため、コミュニティエディションでは動作しません。ミラーが有効なx64コンテナ用のライセンスキー をご用意ください。
導入方法
Dmitriy氏のweb gateway containerをSubModuleとして使用しています。関連ポスト。
下記の変更や追加要素を加えるために、本レポジトリ提供のファイルを置き換える必要があります。
- Web Gatewayキットのバージョン
- ミラー構成
- /api/パスの認識
別途、Webgwatewayのキット(WebGateway-2023.1.1.380.0-lnxubuntu2204x64.tar.gz)をWRCから入手する必要があります。
$ git clone --recursive https://github.com/IRISMeister/simplemirror.git $ cd simplemirror $ mv /temp/WebGateway-2023.1.1.380.0-lnxubuntu2204x64.tar.gz iris-webgateway-example/ $ cp ./webgateway-entrypoint.sh iris-webgateway-example/ $ cp ./webgateway.conf iris-webgateway-example/ $ cp ./webgateway-Dockerfile iris-webgateway-example/Dockerfile $ docker-compose -f iris-webgateway-example/docker-compose.yml build $ cp ミラーが有効なx64コンテナ用のライセンスキー ./iris.key起動方法
$ ./start-all.sh
docker-compose up で起動しないでください。起動手順にdocker-composeでは制御しきれない依存関係があります。
また、特定のコンポーネントの起動・停止状態を可能とするために、意図的に依存性(depends_on)をはずしています。
多数のコンテナ(11個、うち6個がIRISインスタンス)が作成されるため、多数のCPU/メモリ消費とDISK I/Oが発生します。コンテナ実行環境によっては不測のエラーが発生するかもしれません。目的に応じてより軽量な環境を起動する事が出来ます。
| スクリプト | 環境 |
|---|---|
| start-all.sh | 全て起動 |
| start-dr.sh | プライマリ+非同期DR+WebServer1台 |
| start-reporting.sh | プライマリ+非同期レポーティング+WebServer1台 |
| start-sync-dr.sh | プライマリ+バックアップ+非同期DR+WebServer1台 |
| start-sync-reporting.sh | プライマリ+バックアップ+非同期レポーティング+WebServer1台 |
| start-sync.sh | プライマリ+バックアップ+WebServer1台 |
停止方法
$ ./stop.sh
うまく動作しない場合
起動中にIRIS内でエラーが発生した場合、各サービスの出力にエラーが記録されています。
$ docker-compose logs ap1a
$ docker-compose logs ap1b
コンテナ群
起動すると、下記のコンテナ群を起動します。
| コンテナサービス名 | コンテナイメージ | Web公開ポート | 用途 | AWSでの読み替え |
|---|---|---|---|---|
| nginx | nginx | 80 | LB。Web gateway用のreverse proxyとして機能 | 外部LB |
| webgw1 | ビルド | 8080 | Web gateway #1 | EC2 |
| webgw2 | ビルド | 8081 | Web gateway #2 | EC2 |
| ap1a | iris | 9092 | ミラーセットAP1のメンバ | EC2 |
| ap1b | iris | 9093 | ミラーセットAP1のメンバ | EC2 |
| ap2a | iris | 9094 | ミラーセットAP2のメンバ | EC2 |
| ap2b | iris | 9095 | ミラーセットAP2のメンバ | EC2 |
| haproxy | ビルド | 80 | LB。IRIS SuperServer用のreverse proxyとして機能 | 内部LB |
- AP1,AP2はそれぞれHAミラークラスタを構成する単位です。AP1はap1a,ap1bコンテナで構成されます。同様にAP2はap2a,ap2bコンテナで構成されます。以後、ミラーセットAP1,ミラーセットAP2と称します。
- Web gateway #1と#2は負荷分散目的で、全く同じ構成を持ちます。
- NGINXは上記、Web gateway #1,#2をアップストリームに持つreverse proxyとして機能します。
- haproxyはIRISのSuperServerをアップストリームに持つreverse proxyとして構成され、ミラーのVirtual IPの代替えとして機能します。
- 各コンテナは、ポート番号が重複しないように、ポートを変更してホストO/Sにエンドポイントを公開しています。
- IRISの構成にはcpfマージを使用しています。ミラー構成のために、gmheapを増やしています。
- 各コンテナ要素をAWSの要素に置き換えて考えることができます。その場合、docker-composeはVPC環境、ホストO/SはVPCの外側に相当すると考えます。

ca4ab62af636f4da7110a31e681bedaac68eaef5
Web endpoints
Webサーバが複数(専用Apache×2, IRIS同梱のApache×4, LB代わりのNGINXの計7台)存在するため、多数のエンドポイントが用意されますが、主たる用途を考慮すると使用に適したものは限定されます。
<<<<<<< HEAD
Stop the containers:
docker-compose down
docker-compose up -d
Notes
Starting with 2019.3 IRIS containers use “irisowner” instead of “root”, so the installation is a Nonroot installation.
See https://irisdocs.intersystems.com/irislatest/csp/docbook/DocBook.UI.Page.cls?KEY=GCI_unix#GCI_unix_install_nonroot
This allow the scripts to be simpler and you don’t need to pass credentials.
The folder “irismirror older versions” contains the same simple mirror working for older versions. See readme inside.
Web gateway management portal
利便性のため、全てのポートをO/Sに公開しています。管理画面なので、AWS環境では、外部(LB)からのアクセスは無く、踏み台ホストからのアクセスが主になると想定しています。
| 要素 | エンドポイント | 備考 |
|---|---|---|
| AP1A組み込みApache | http://irishost:9092/csp/bin/Systems/Module.cxw | You are not authorized to use this facility,未使用 |
| AP1B組み込みApache | http://irishost:9093/csp/bin/Systems/Module.cxw | You are not authorized to use this facility,未使用 |
| AP1D組み込みApache | http://irishost:9094/csp/bin/Systems/Module.cxw | You are not authorized to use this facility,未使用 |
| AP2A組み込みApache | http://irishost:9095/csp/bin/Systems/Module.cxw | You are not authorized to use this facility,未使用 |
| AP2B組み込みApache | http://irishost:9096/csp/bin/Systems/Module.cxw | You are not authorized to use this facility,未使用 |
| AP2R組み込みApache | http://irishost:9097/csp/bin/Systems/Module.cxw | You are not authorized to use this facility,未使用 |
| Web Gateway#1 | http://irishost:8080/csp/bin/Systems/Module.cxw | |
| Web Gateway#2 | http://irishost:8081/csp/bin/Systems/Module.cxw | |
| NGINX | http://irishost/csp/bin/Systems/Module.cxw | 本用途に不向き |
管理ポータル
利便性のため、全てのポートをO/Sに公開しています。管理画面なので、AWS環境では、外部(LB)からのアクセスは無く、踏み台ホストからのアクセスが主になると想定しています。
IRIS提供の管理用REST API
- アクセス時には認証が必要です
$ curl http://irishost:9092/api/mgmnt/ -u SuperUser:SYS -s | jq
Health Check
特定のミラーメンバのロール(プライマリか、それ以外か)を調べるためのエンドポイントです。
| 要素 | エンドポイント | 備考 |
|---|---|---|
| Web Gateway#1 | http://irishost:8080/ap1a/csp/mirror_status.cxw | AP1A |
| Web Gateway#1 | http://irishost:8080/ap1b/csp/mirror_status.cxw | AP1B |
| Web Gateway#1 | http://irishost:8080/ap2a/csp/mirror_status.cxw | AP2A |
| Web Gateway#1 | http://irishost:8080/ap2b/csp/mirror_status.cxw | AP2B |
| Web Gateway#2 | http://irishost:8081/ap1a/csp/mirror_status.cxw | AP1A |
| Web Gateway#2 | http://irishost:8081/ap1b/csp/mirror_status.cxw | AP1B |
| Web Gateway#2 | http://irishost:8081/ap2a/csp/mirror_status.cxw | AP2A |
| Web Gateway#2 | http://irishost:8081/ap2b/csp/mirror_status.cxw | AP2B |
ユーザ作成のRESTアプリケーション
下記のエンドポイントに、IRISホスト名などの情報をJSONで返却する簡単なRESTアプリケーションを用意してあります。
| 要素 | エンドポイント | 備考 |
|---|---|---|
| NGINX | http://irishost/ap1/csp/user/api/get | ミラーセットAP1のプライマリメンバ |
| NGINX | http://irishost/ap2/csp/user/api/get | ミラーセットAP2のプライマリメンバ |
| Web Gateway#1 | http://irishost:8080/ap1/csp/user/api/get | ミラーセットAP1のプライマリメンバ |
| Web Gateway#2 | http://irishost:8080/ap2/csp/user/api/get | ミラーセットAP2のプライマリメンバ |
$ curl http://irishost:8080/ap1a/csp/user/api/get -s | jq
{
  "HostName": "ap1a",
  "UserName": "UnknownUser",
  "Status": "OK",
  "TimeStamp": "02/08/2023 16:21:00"
}
動作確認
各ミラーの状態に置ける、Health CheckとRESTアプリケーションの応答は下記のようになります。
注意) Active Health Checksは有償のNGINX Plusのみで提供されているので、動作はPassiveになります。
つまり、本例のNGINXはmirror_status.cxwは使用していません。
InterSystems API Managerには Active Health Check機能が含まれています。
事前準備
もし、この時点でなんらかのアクセスを行っている場合、状態をリセットするために、いったん全コンテナの停止・起動を実行します。
$ ./stop.sh
$ ./start.sh
状態 ap1a:プライマリ, ap1b:バックアップ
起動直後の状態です。Health Checkの応答は以下の通りです。
$ curl -m 5 http://irishost:8080/ap1a/csp/mirror_status.cxw -v
$ curl -m 5 http://irishost:8081/ap1a/csp/mirror_status.cxw -v
< HTTP/1.1 200 OK
SUCCESS
$ curl -m 5 http://irishost:8080/ap1b/csp/mirror_status.cxw -v
$ curl -m 5 http://irishost:8081/ap1b/csp/mirror_status.cxw -v
< HTTP/1.1 503 Service Unavailable
FALIED
RESTアプリケーションコールで、リクエストがap1a(ミラーセットAP1のプライマリメンバ)、ap2a(ミラーセットAP2のプライマリメンバ)に到達していることが確認できます。
$ curl http://irishost/ap1/csp/user/api/get -s | jq
{
  "HostName": "ap1a",
  "UserName": "UnknownUser",
  "Status": "OK",
  "TimeStamp": "02/09/2023 12:36:26"
}
$ curl http://irishost/ap2/csp/user/api/get -s | jq
{
  "HostName": "ap2a",
  "UserName": "UnknownUser",
  "Status": "OK",
  "TimeStamp": "02/09/2023 12:36:40"
}
NGINXのログは下記のようになっているはずです。10.0.100.11:80(Web Gateway #1),10.0.100.12:80(Web Gateway #2)が交互に使用されています。
$ docker-compose logs -f nginx
nginx      | 10.0.100.1 - - [09/Feb/2023:12:36:26 +0900] "GET /ap1/csp/user/api/get HTTP/1.1" 200 103 "-" "curl/7.81.0" "-" "10.0.100.12:80"
nginx      | 10.0.100.1 - - [09/Feb/2023:12:36:40 +0900] "GET /ap2/csp/user/api/get HTTP/1.1" 200 103 "-" "curl/7.81.0" "-" "10.0.100.11:80"
2台のWebgatewayに、全ミラー構成(2セット)を認識させるために、下記を再実行します。
$ curl http://irishost/ap1/csp/user/api/get?[1-2] -s | jq
$ curl http://irishost/ap2/csp/user/api/get?[1-2] -s | jq
この段階で、Web gateway management portalのSystem Status画面を確認します。
いずれも、下記の状態(MIRROR1,MIRROR2のPrimary/Failoverを認識している,n1~n4は数値)になっている事を確認します。ServerNameに下記以外のものが存在しても問題ありません。
| ServerNumber | ServerName | MirrorMember | MirrorStatus |
|---|---|---|---|
| n1 | ap1 | MIRRORSET:AP1A/IRIS | Primary |
| n2 | ap1 | MIRRORSET:AP1B/IRIS | Failover |
| n2 | ap1 | MIRRORSET:AP1D/IRIS | Async |
| n3 | ap2 | MIRRORSET:AP2A/IRIS | Primary |
| n4 | ap2 | MIRRORSET:AP2B/IRIS | Failover |
この状態になっていない場合、以後の動作は記載と異なったものとなります。
状態 ap1a:停止, ap1b:プライマリ
ap1aのIRISを停止して、ap1bをプライマリに昇格させた後にHealth Checkの応答を確認します。
ap1aが応答しなくなったため、curlでtimeout(5秒)が発生しました。
NGINXのActive Healthcheckが利用できる環境であれば、この接続は無効にマークされますが、前述の通り、本例はPassive Healthcheckでの動作ですので、この応答は利用していません。
$ docker-compose exec ap1a iris stop iris quietly
$ curl -m 5 http://irishost:8080/ap1a/csp/mirror_status.cxw -v
curl: (28) Operation timed out after 5001 milliseconds with 0 bytes received
$ curl -m 5 http://irishost:8080/ap1b/csp/mirror_status.cxw -v
< HTTP/1.1 200 OK
SUCCESS
Web gatewayが、ミラーの状態を認識して、プライマリメンバにリクエストを送信するため、アプリケーションへのAPIコールは、ap1b(プライマリに昇格した元バックアップメンバ)に到達します。。
$ curl http://irishost/ap1/csp/user/api/get -s | jq
{
  "HostName": "ap1b",
  "UserName": "UnknownUser",
  "Status": "OK",
  "TimeStamp": "02/09/2023 13:36:04"
}
状態 ap1a:停止, ap1b:停止
ap1ミラークラスタの全IRISメンバを停止状態にします。
Health Checkに誰も応答しないので、下記はいずれもcurlでtimeout(5秒)が発生しました。
$ docker-compose exec ap1b iris stop iris quietly
$ curl -m 5 http://irishost:8080/ap1a/csp/mirror_status.cxw -v
curl: (28) Operation timed out after 5001 milliseconds with 0 bytes received
$ curl -m 5 http://irishost:8080/ap1b/csp/mirror_status.cxw -v
curl: (28) Operation timed out after 5001 milliseconds with 0 bytes received
アプリケーションへのAPIコールも誰も応答しないので、curlでtimeout(5秒)が発生しました。
$ curl -m 5 http://irishost/ap1/csp/user/api/get
curl: (28) Operation timed out after 5001 milliseconds with 0 bytes received
curlのタイムアウトを設定しない場合、各種設定値次第ですが、どこかでタイムアウトが発生します。今回のケースでは、NGINX->Web Gateway#2がタイムアウトしました。その後、NGINXがWeb gateway #1をトライしましたが、NGINX->Web Gateway#1もタイムアウトを起こしたので、最終的にNGINXからcurlにエラー(504 Gateway Time-out)が返っています。
(Web gatewayのServer Response Timeoutと、NGINXのproxy_xxx_timeoutの関係で決まります)
$ curl http://irishost/ap1/csp/user/api/get
<html>
<head><title>504 Gateway Time-out</title></head>
<body>
<center><h1>504 Gateway Time-out</h1></center>
<hr><center>nginx/1.23.3</center>
</body>
</html>
その様子は、下記のログで確認できます。
14:16:17にwebgw2にリクエストが来ますが、それが1分後にタイムアウトし、14:17:17にNGINXにその旨記録されています。NGINXはその後webgw1にリクエストしますが、それも1分後の14:18:17にタイムアウトし、NGINXにその旨が記録されています。
$ docker-compose logs -f webgw1 ・ ・ webgw | 10.0.100.13 - - [09/Feb/2023:14:17:17 +0900] "GET /ap1/csp/user/api/get HTTP/1.0" 500 -$ docker-compose logs -f webgw2 webgw2 | 10.0.100.13 - - [09/Feb/2023:14:16:17 +0900] "GET /ap1/csp/user/api/get HTTP/1.0" 500 -
$ docker-compose logs -f nginx ・ ・ nginx | 2023/02/09 14:17:17 [warn] 28#28: *7 upstream server temporarily disabled while reading response header from upstream, client: 10.0.100.1, server: nginx, request: "GET /ap1/csp/user/api/get HTTP/1.1", upstream: "http://10.0.100.12:80/ap1/csp/user/api/get", host: "irishost" nginx | 2023/02/09 14:17:17 [error] 28#28: *7 upstream timed out (110: Connection timed out) while reading response header from upstream, client: 10.0.100.1, server: nginx, request: "GET /ap1/csp/user/api/get HTTP/1.1", upstream: "http://10.0.100.12:80/ap1/csp/user/api/get", host: "irishost" nginx | 2023/02/09 14:18:17 [warn] 28#28: *7 upstream server temporarily disabled while reading response header from upstream, client: 10.0.100.1, server: nginx, request: "GET /ap1/csp/user/api/get HTTP/1.1", upstream: "http://10.0.100.11:80/ap1/csp/user/api/get", host: "irishost" nginx | 10.0.100.1 - - [09/Feb/2023:14:18:17 +0900] "GET /ap1/csp/user/api/get HTTP/1.1" 504 167 "-" "curl/7.81.0" "-" "10.0.100.12:80, 10.0.100.11:80" nginx | 2023/02/09 14:18:17 [error] 28#28: *7 upstream timed out (110: Connection timed out) while reading response header from upstream, client: 10.0.100.1, server: nginx, request: "GET /ap1/csp/user/api/get HTTP/1.1", upstream: "http://10.0.100.11:80/ap1/csp/user/api/get", host: "irishost"
状態 ap1a:プライマリ, ap1b:停止
ap1aを起動します。ap1aはプライマリになります。
ap1bは停止状態のままですので、curlでtimeout(5秒)が発生しました。
$ docker-compose exec ap1a iris start iris quietly
$ curl -m 5 http://irishost:8080/ap1a/csp/mirror_status.cxw
SUCCESS
$ curl -m 5 http://irishost:8080/ap1b/csp/mirror_status.cxw
curl: (28) Operation timed out after 5001 milliseconds with 0 bytes received
アプリケーションへのAPIコールは、ap1a(プライマリ)に到達していることが確認できます。
$ curl -m 5 http://irishost/ap1/csp/user/api/get -s | jq
{
  "HostName": "ap1a",
  "UserName": "UnknownUser",
  "Status": "OK",
  "TimeStamp": "02/09/2023 14:29:07"
}
連続で負荷をかけてみる
正常な状態に戻すために、いったん全コンテナの停止・起動を実行します。
$ ./stop.sh
$ ./start.sh
連続でリクエストを発生させても正常に動作することを確認します。
$ curl -m 5 http://irishost:8080/ap1a/csp/mirror_status.cxw?[1-100]
全てSUCCESSが返るはずです。
$ curl -m 5 http://irishost/ap1/csp/user/api/get?[1-100]
全て”HostName”: “ap1a”の応答が返るはずです。
Web gateway managementのSystem Statusで、どのような接続が作成されているかを確認する事ができます。
また、下記で、Web gatewayを再起動して接続やカウンタをリセットする事ができます。
$ docker-compose restart webgw1
$ docker-compose restart webgw2
補足)
Web gateway management portalで[Status=Server]が複数発生していたので、無効化しました。
[SYSTEM]
REGISTRY_METHODS=Disabled
BI機能を試す
ap2rは非同期のレポーティングメンバとして稼働しています。プライマリメンバ(ap2a)に対して発生したレコードの変更を、ap2rでキャッチアップし、組み込みBI機能分析することが可能です。
起動時点で、2000件程度のレコートが同期されています。
下記コマンドで初期データをBIキューブに反映します。
$ docker-compose exec ap2r iris session iris '##class(%DeepSee.Utils).%SynchronizeCube("HOLEFOODS",1)'
1,883 fact(s) updated
Elapsed time: .983161s
下記コマンドで、件数が1,000になっていることを確認できます。
docker-compose exec ap2r iris session iris "##class(%DeepSee.Utils).%Shell()" DeepSee Command Line Shell ---------------------------------------------------- Enter q to quit, ? for help. >>select from HOLEFOODSResult: 1,000
Elapsed time: .112427s >>
プライマリメンバで新たに10,000件のレコードを新規作成します。
$ docker-compose exec ap2a iris session iris -UMIRRORNS "##class(HoleFoods.Utils).AddData(10000)"
10,000 row(s) created
これらの差分を下記コマンドでBIキューブに反映します。
$ docker-compose exec ap2r iris session iris '##class(%DeepSee.Utils).%SynchronizeCube("HOLEFOODS",1)'
10,000 fact(s) updated
Elapsed time: 4.419442s
件数が上記で新規作成した件数だけ増加している事を確認します。
docker-compose exec ap2r iris session iris "##class(%DeepSee.Utils).%Shell()" DeepSee Command Line Shell ---------------------------------------------------- Enter q to quit, ? for help. >>select from HOLEFOODSResult: 11,000
Elapsed time: .112717s >>
下記URLでレポーティングメンバ上のBI機能にアクセスできます。
http://irishost:8080/ap2r/csp/user/_DeepSee.UI.Analyzer.zen?$NAMESPACE=MIRRORNS&CUBE=HoleFoods.cube
HAPROXY
各IRISのポート:1972に対してHAPROXYを設定してあります。これにより、HAPROXY経由でのアクセスは常にプライマリメンバへのアクセスになります。
| ミラークラスタ | バックエンド | フロントエンド | 備考 |
|---|---|---|---|
| ap1 | ap1a:1972,ap1b:1972 | irishost:1972 | |
| ap2 | ap2a:1972,ap2b:1972 | irishost:11972 |
$ docker-compose logs -f haproxy
haproxy    | [WARNING] 056/112355 (9) : Server iris2/ap2a is UP, reason: External check passed, code: 0, check duration: 43ms. 1 active and 0 backup servers online. 0 sessions requeued, 0 total in queue.
haproxy    | [WARNING] 056/112356 (9) : Server iris1/ap1a is UP, reason: External check passed, code: 0, check duration: 52ms. 1 active and 0 backup servers online. 0 sessions requeued, 0 total in queue.
例えば、次のJDBC接続で、SQLクエリを実行できます。
jdbc:IRIS://irishost:1972/mirrorns  (ap1のプライマリメンバ)
jdbc:IRIS://irishost:11972/mirrorns (ap2のプライマリメンバ)
select * from User_Report.Record
DR非同期のミラーリングの切替え、切戻しについて
こちらを参照ください。
ca4ab62af636f4da7110a31e681bedaac68eaef5
Made with
Version
1.0.008 Oct, 2019
Ideas portal
Category
Works with
InterSystems IRISFirst published
08 Oct, 2019Last edited
08 Oct, 2019Last checked by moderator
27 Jun, 2023Works