
© 2024 InterSystems Corporation, Cambridge, MA. All rights reserved.Privacy & TermsGuaranteeSection 508Contest Terms
Database Growth - Data Collection and Analysis

3.5
1 reviews
0
Awards
3
Views
0
IPM installs
 0
0 0
0
Details
Releases
Reviews
Issues
Pull requests
The two continued repos are linked at the end of DataCollection.
What's new in this version
Initial Release
Data Collection
This is a step-by-step instruction guide for creating a task to collect data about the InterSystems database and globals therein.
Disclaimer: This software is merely for TEST/DEMO purposes. This code is not supported by InterSystems as part of any released product. It is supplied by InterSystems as a demo/test tool for a specific product and version. The user or customer is fully responsible for the maintenance and testing of this software after delivery, and InterSystems shall bear no responsibility nor liabilities for errors or misuse of this code.
-
First, import the file “DataCollection.xml” via studio, and make sure there are no errors. If there are it could be a matter of versioning, contact Ari Glikman at ari.glikman@intersystems.com for support on getting a version that’s right for you. Furthermore, ensure that you import the data into the namespace whose internal data you want collected for later inspection.
-
Once importing is complete you should see the package Sample with several sub-packages as well
If a Sample package is already present on your server, then you should still see the new subpackages along with any other folders that were previously there.
- It is now time to run unit testing to make sure everything works correctly.
a. Create a folder called Unit Tests that can be read by your InterSystems Terminal, for example, since I have a local installation, I will just make a folder in my C drive.
b. Into this folder we will now export the class Sample.DBExpansion.Test.CaptureTest as an xml file.
c. In terminal set the global ^UnitTestRoot = “<< folder that the Unit Tests folder is >>”. Per the example above, it would be (note that you must be in the same namespace where you imported the package) C:\ (note that it is not “C:\Unit Tests” !)
set ^UnitTestRoot = "C:\"
d. Finally, we run the Unit Tests. Do this by running the following line of code from the terminal:
do ##class(Sample.DBExpansion.Test.TestManager).RunTest("Unit Tests", "/noload/nodelete")
We are essentially telling the program to run all tests that are found in the folder C:\Unit Tests. At the moment we only have one file there, the one created in 3.b.
The output should be as follows
If the unit tests do not pass, then the program is not ready to run. Do not continue with the next steps until you get output that says all tests passed.
- Congrats! It is now time to build the task. To do this:
a. Open the management portal and go to System Operation > Task Manager > New Task
note that your user must have access to the %SYS namespace. otherwise the task will run but not collect any data
You will now be given several fields to fill as to what task you want to create. You will choose the namespace in which you imported the package and give the task a name. A description should be given for future reference. Ideally leave the fast checkbox unselected, this means that the task will run slower but will collect more complete data. If this will take too long to run (depends on how big the database and its globals are) then perhaps it is best to tick here and opt for a faster task. The HowManyGlobals indicates how many globals should be collected: -1 indicates all globals and is the recommended option. Select Next, choose how often the task should run, and click finish.
b. You will now be prompted with the Task Schedule where you can see when all tasks, including the newly created one are scheduled to run. If you additionally wish to run it now select Run on the right hand side.
Select the Task History to ensure that it was created successfully. After running the task you should see that it ran successfully as well. Otherwise an error should be seen here.
This task will create two tables:
Sample_DBExpansion_Data.DBAnalysisInfo
This table is going to store data about the database itself. We refer to this as “Meta data”. The information it stores can be seen in the image below. The Fast Flag will indicate the selection chosen in 4.a.
Sample_DBExpansion_Data.GlobalAnalysisInfo
This will contain the information regarding the globals in the database. Note that if there is a class name that is associated with the global, we will see it here along with their size. Lastly, note that the MetaDataID field corresponds to the ID field of the Sample_DBExpansion_Data.DBAnalysisInfo table. This means to say that at the time the database information was captured, its corresponding global information was captured and they share this identifying number (these are the globals in the database at that time). It is a way to see how the globals in a database, and the database itself evolve through time.
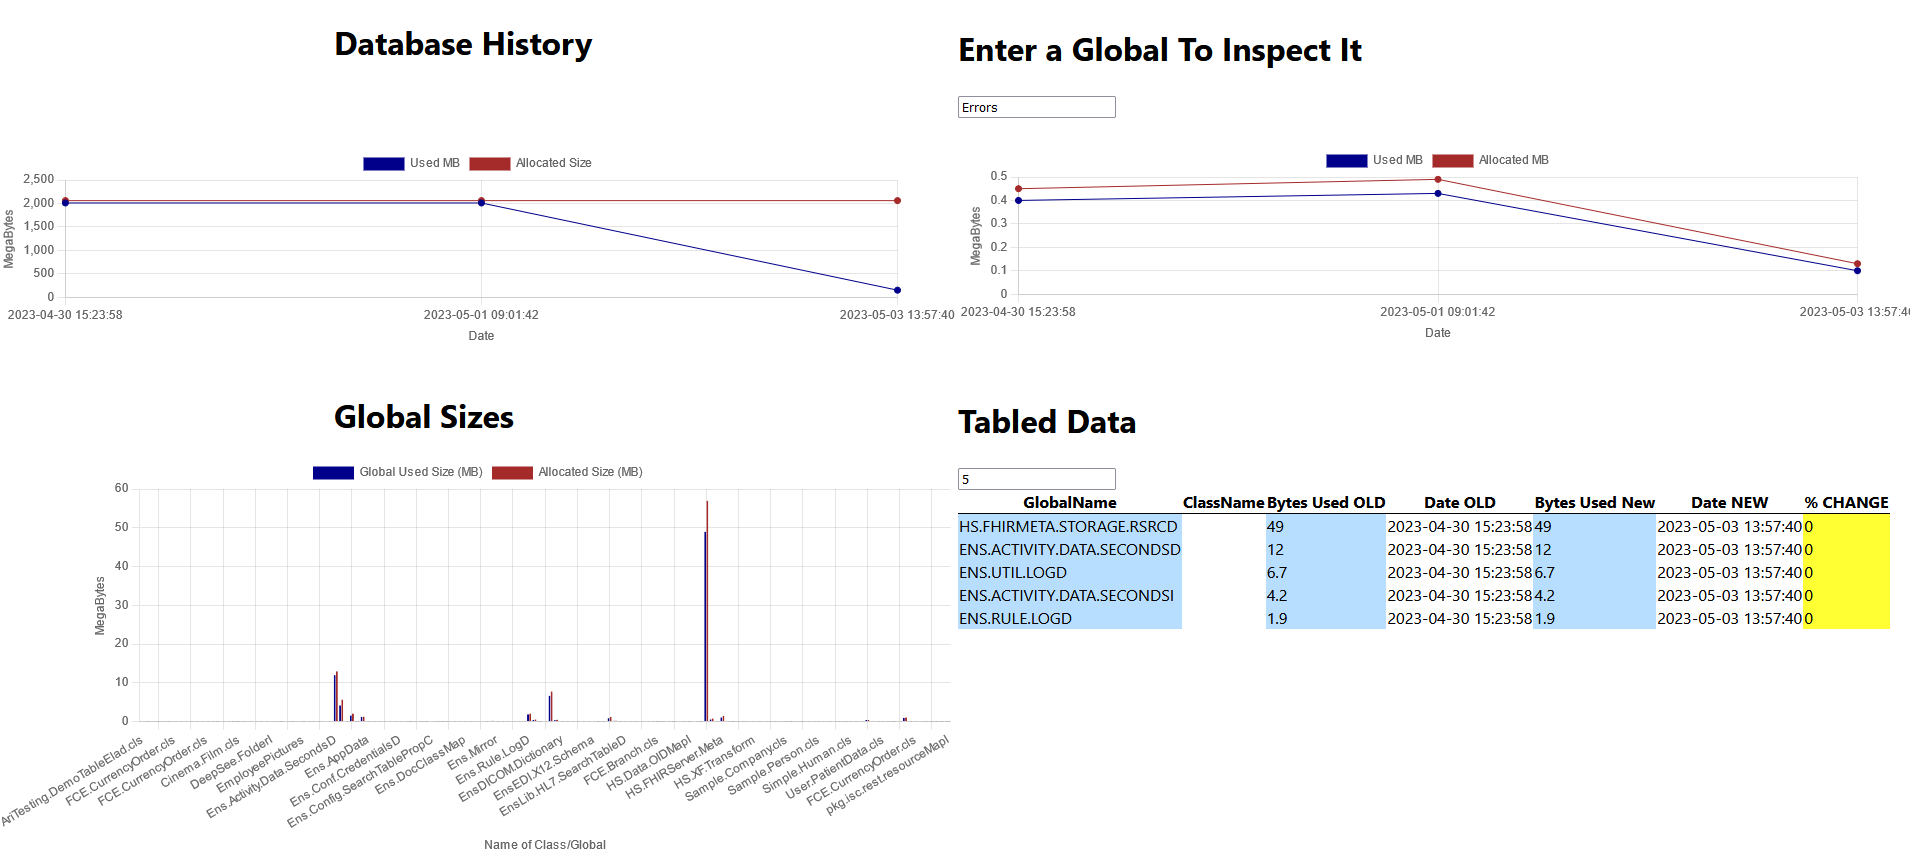
- Next is the ever so slightly prettier User Interface.
It displays information about the global and database displayed in the table in a more digestible manner. There are 3 graphs: one displaying the history of the data, the second displaying the historic sizes of a chosen global, either through the dropdown or a search, and finally there is an overview of all global sizes. At the bottom there is a table where one enters how many globals to display and it presents them ordered by size. The %Change column is highlighted yellow for a minimal change in size, green for a decrease in size, and red for a significant increase in size.
Find step-by-step instructions on how to set this up here.
If you’re not interested in the graphs, then continue onto data analysis here.
Contact Ari @ Ari.Glikman@InterSystems.com with any questions or suggestions.
Version
1.0.025 Apr, 2024
Category
Works with
InterSystems IRISInterSystems IRIS for HealthHealthShareCachéEnsembleFirst published
25 Apr, 2024