© 2026 InterSystems Corporation, Cambridge, MA. All rights reserved.Privacy & TermsGuaranteeSection 508Contest Terms

Contest-FHIR 

4.5
1 reviews
1
Awards
998
Views
0
IPM installs
 0
0 0
0
Details
Releases (3)
Reviews (1)
Awards (1)
Issues
Articles (2)
Easy CSV to FHIR to SQL to JUPYTER in full PYTHON
What's new in this version
In this new version, I used new tools and techniques I discovered at the EUROPEAN HEALTHCARE HACKATHON in which I was invited by InterSystems as a guest and as a mentor to display the multiple projects I did in my intership back in April 2022.
Today I present to you the V2 of my application, it can now transform CSV to FHIR to SQL to JUPYTER notebook.
This is for me a really huge step in InterSystems technologies and I think this tool will be used for many other purpuse and cases.
1. Contest-FHIR
*** CSV TO FHIR TO SQL TO JUPYTER ***
This is a full python IRIS production that gather information from a csv, use a DataTransformation to make it into a FHIR object, save that information to a FHIR server.
From here we can use the SQL BUILDER TOOL to transform our FHIR DataBase to a SQL DataBase in order to analyze or to implement machine learning.
For the latter, we can use the implemented JUPYTER connection to our server that will help use get all the information from our FHIR server to a DataFrame Pandas in Python notebook.
From here doing machine learning is quite easy !!!
In conclusion, in a few clicks you’ll be able to transform your CSV to a FHIR server, then to an SQL server then analyze this server using Pandas in Jupyter Python !
This use interop, FHIR, SQL, and Jupyter.
The objective is to help people understand how easy it is to use FHIR.
I didn’t have the time to create a csv about women’s health, but you can easily imagine this application using a csv on Women’s Health.
- 1. Contest-FHIR
- 2. Prerequisites
- 3. Installation
- 4. FHIR server
- 5. Walkthrough
- 6. Conclusion
- 7. Creation of a new DataTransformation
- 8. What’s inside the repo
2. Prerequisites
Make sure you have git and Docker desktop installed.
If you work inside the container, as seen in 3.3., you don’t need to install fhirpy and fhir.resources.
If you are not inside the container, you can use pip to install fhirpy and fhir.resources.
Check fhirpy and fhir.resources for morte information.
3. Installation
3.1. Installation for development
Clone/git pull the repo into any local directory e.g. like it is shown below:
git clone https://github.com/LucasEnard/fhir-client-python.git
Open the terminal in this directory and run:
docker-compose up --build
This will create the IRIS Framework and the FHIR Server.
Once you are done building enter the Management portal, open the interop tab, open the Production and start it.
Now you will see that the CSV was automatically read from your local files and added to the FHIR server.
This app will periodically read any csv inside the “csv” folder and will send it to the FHIR server, doing the Data Transformation needed.
3.2. Management Portal and VSCode
This repository is ready for VS Code.
Open the locally-cloned Contest-FHIR folder in VS Code.
If prompted (bottom right corner), install the recommended extensions.
3.3. Having the folder open inside the container
You can be inside the container before coding if you wish.
For this, docker must be on before opening VSCode.
Then, inside VSCode, when prompted (in the right bottom corner), reopen the folder inside the container so you will be able to use the python components within it.
The first time you do this it may take several minutes while the container is readied.
If you don’t have this option, you can click in the bottom left corner and press reopen in container then select From Dockerfile

By opening the folder remote you enable VS Code and any terminals you open within it to use the python components within the container.
4. FHIR server
To complete this walktrough we will use a fhir server.
This fhir server was already build-in when you cloned and build the container.
The url is localhost:52773/fhir/r4 inside the container and localhost:33783/fhir/r4 on your machine.
5. Walkthrough
Complete walkthrough of the Python IRIS production.
5.1. CSV TO FHIR
Here you must use the ProductionCSV and change the parameters if needed to transform any CSV file added to the data/in folder to your FHIR server.
This link will help you load the ProductionCSV, change the parameters if needed and start it :
http://localhost:33783/csp/healthshare/fhirserver/EnsPortal.ProductionConfig.zen?$NAMESPACE=FHIRSERVER&$NAMESPACE=FHIRSERVER&
Connect using :
username : superuser
password : SYS
Go to Action in the far right menu, then click Open then choose Python and ProducitonCSV !
Now START the production.
Just by loading it and starting it, the production should automatically load a really simple csv file containing information on some organizations to our FHIR server.
Note :
If you want to do it with others fhir resources you need to create a new Data Transfomation and create a new message type.
5.1.1. FHIR ?
We now have a FHIR server ( That was pre-filled with random generated Organization and Patient ) that also contains our 2 new organizations !!
All that from a simple click in the Production.
5.2. FHIR TO SQL
Here we will use a powerful InterSystems tool that allows us to transform any FHIR server to an SQL server and perform some more transformation on the data if needed !
For that follow :
http://localhost:33783/csp/fhirsql/index.csp/
Connect using :
username : superuser
password : SYS
We will now create an analysis of our FHIR repo, then a projection, and finally we will convert it to SQL.
5.2.1. FHIR ANALYSIS
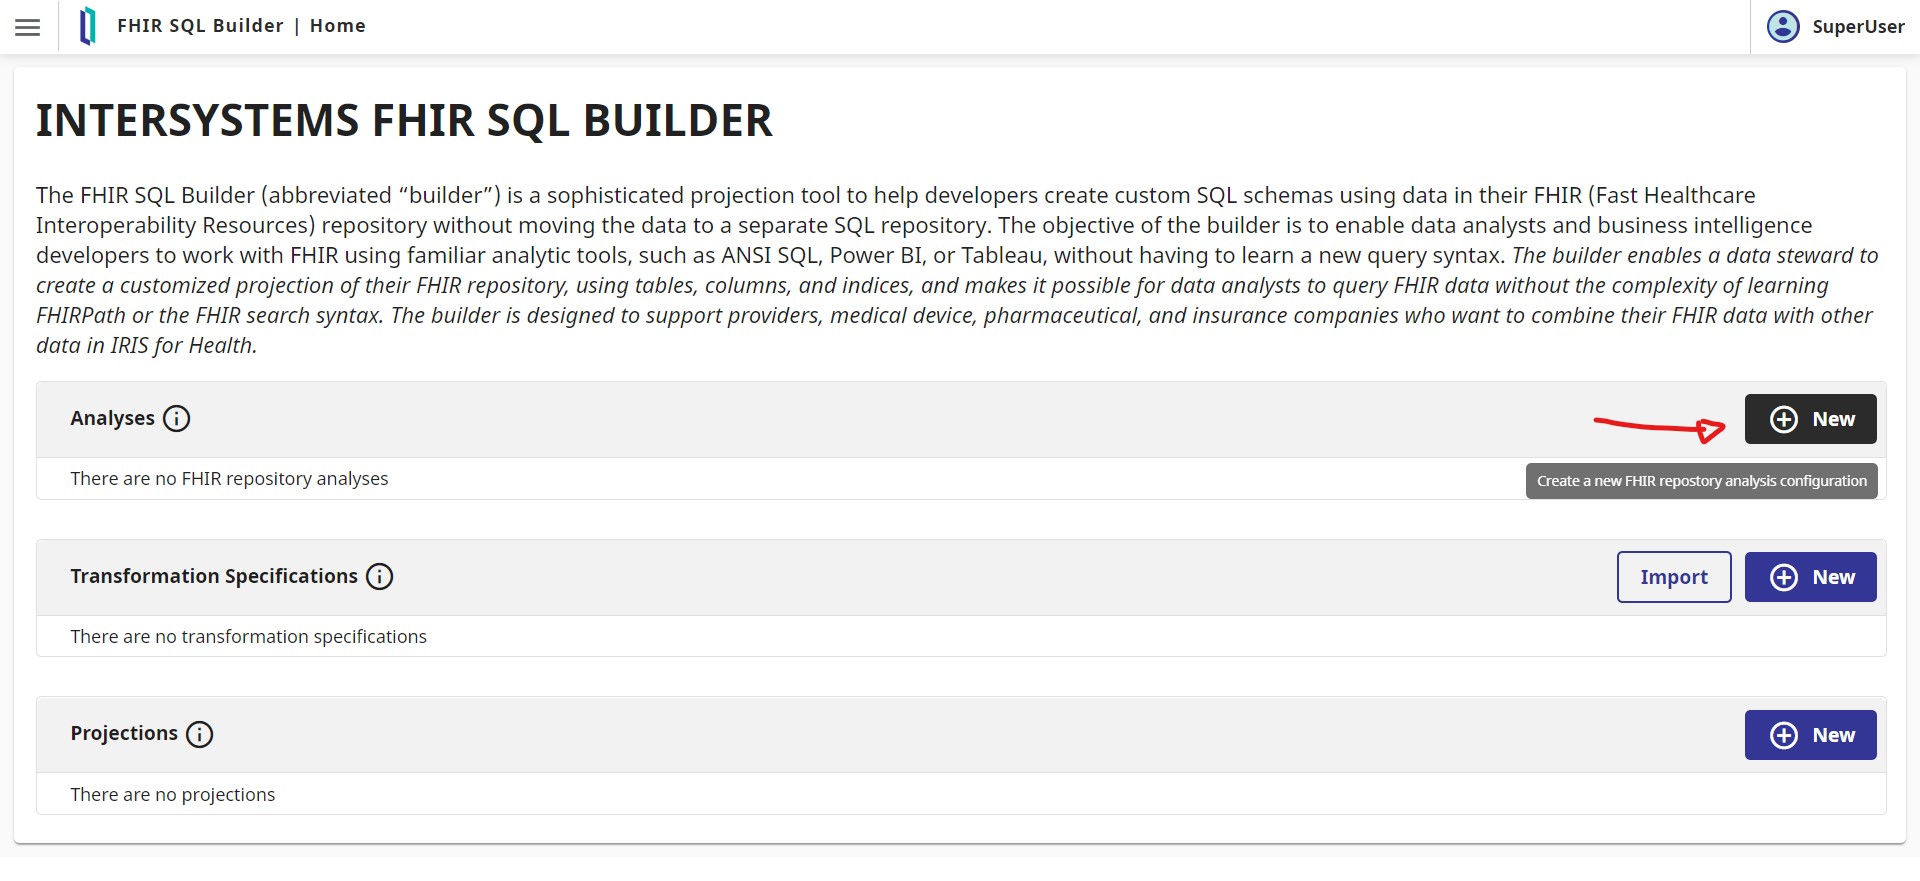

Here, enter :
Name : Local_FHIR
Host : localhost
Port : 52773
SSL conf : don’t touch
Credentials : Press new and add a new credentials like
name : superuser
username : superuser
password : SYS
FHIR Repository URL : /fhir/r4
And press OK.
Now enter 100 in Selectivity Percentage and press Launch Analysis Task.
Note
It’s possible to use any FHIR server here, and the configuration given in this GitHub is just for our InterSystems local FHIR server ( Note that you could use also a cloud InterSystems FHIR server )
5.2.2. FHIR PROJECTION
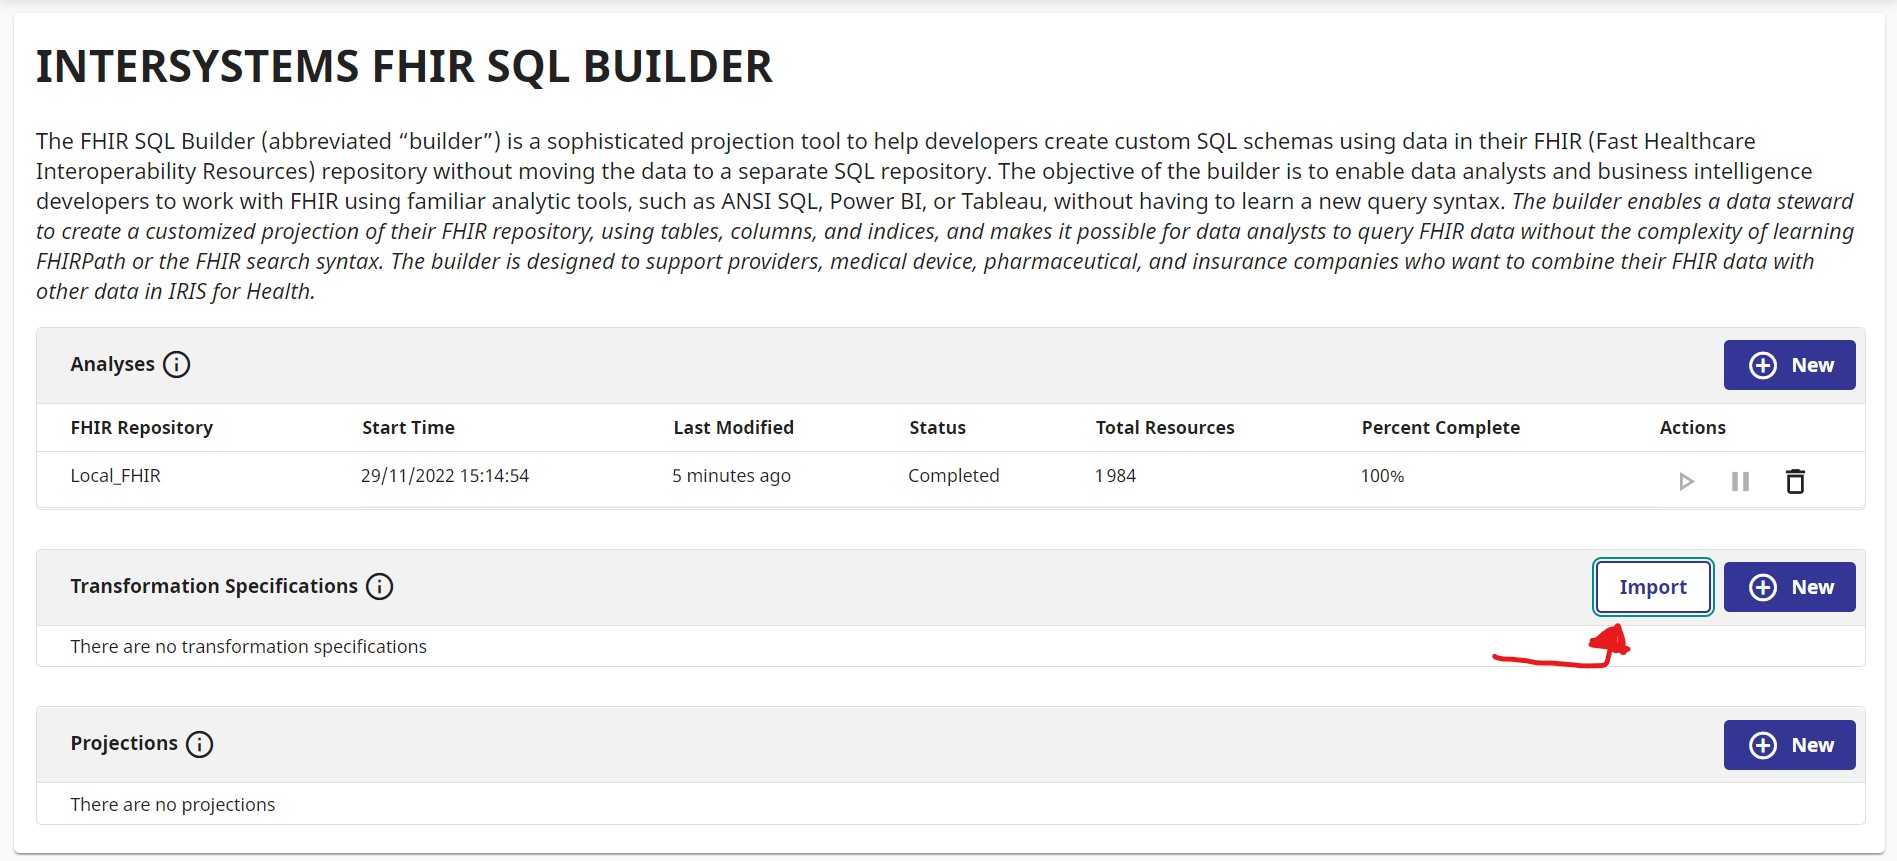
We have prepared a simple and easy projection from FHIR to SQL.
Click import and select Contest-FHIR/misc/ExportFHIRtoSQL.json.
Select :
Name : T1
Analysis : Local_FHIR
Press Import.
5.2.3. PROJECTION TO SQL
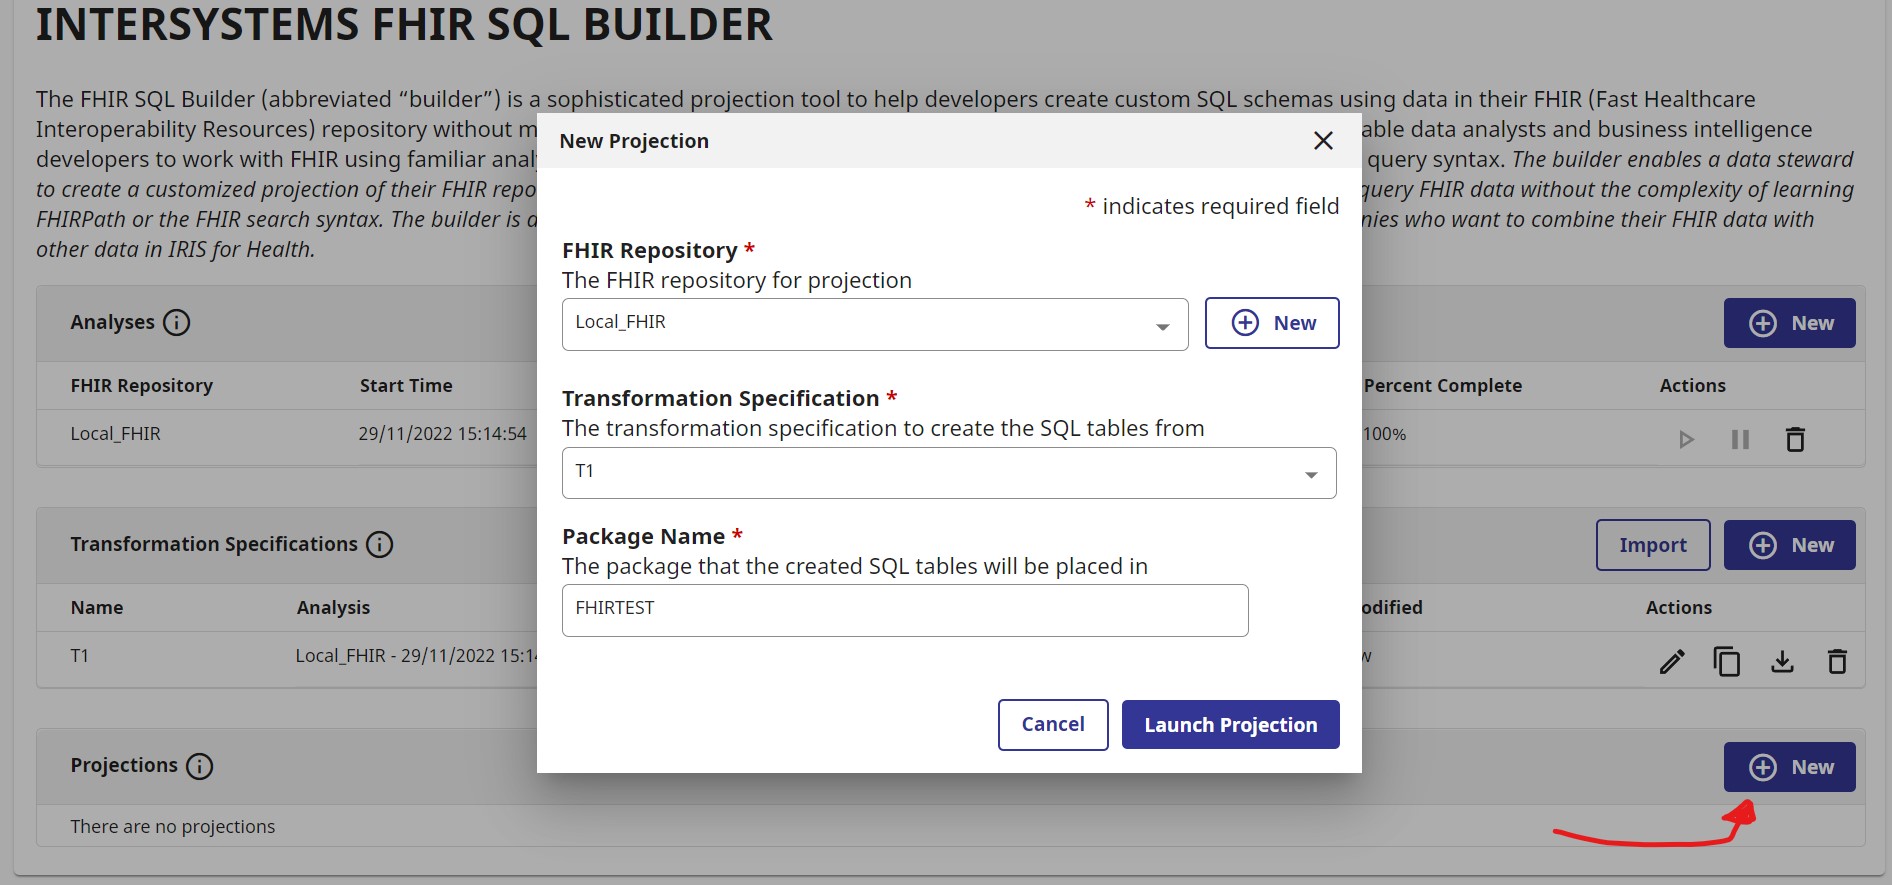
Then press Launch Projection
5.2.4. SQL ?
We now have an SQL server ( That was pre-filled with random generated Organization and Patient ) that also contains our 2 new organizations !!
All that from simples steps using the FHIR SQL BUILDER from InterSystems.
You can access the SQL server following this link :
http://localhost:33783/csp/sys/exp/%25CSP.UI.Portal.SQL.Home.zen?$NAMESPACE=FHIRSERVER
See also :

You can clearly see the generated information presented here but also our two Organization added in the beginning.
5.3. SQL TO JUPYTER
Now that we have done CSV to FHIR to SQL, we need to gather the information from this SQL server to our Jupyter NoteBook.
For that follow this link :
http://localhost:8888/notebooks/SqlAlchemy.ipynb
From here, you can, using the incredible sqlalchemy tool, plug into our SQL IRIS DataBase and ‘play’ with our data while having everything protected and stored in FHIR, the future of the Health industry storage.

You can easily imagine plugging behind this a Machine Learning model, or a deep analysis of our data using all the wonderful Python tools.
6. Conclusion
I hope you are all convinced by now of the power of this tool.
If you want to sell InterSystems to your clients this the demo you need !
Fast data integration to an IRIS FHIR server, fast and realiable conversion from FHIR to SQL then all the data inside a Python NoteBook in a Pandas DataFrame, ready to be worked on by our best data analyst or to be used a fuel to your best Machine learning models !!!
Special thanks to Guillaume Rongier, Evgeny Shvarov, Dmitry Zasypkin and [Dmitry Maslennikov ](https://github.com/LucasEnard/Contest-FHIR/blob/master/) as I’m using tools from them like the FHIR SQL BUILDER, the SQLALCHEMY module in Python or the incredible interoperability-embedded-python from Guillaume Rongier. Without this last tool nothing of what I’ve did would work since I know almost nothing in ObjectScript and this allowed me to continue participating in the Dev Community.
Thanks again everyone.
7. Creation of a new DataTransformation
This repository is ready to code in VSCode with InterSystems plugins.
Open /src/python to start coding or using the autocompletion.
Steps to create a new transformation
To add a new transformation and use it, the only things you need to do is add your csv named Patient.csv ( for example ) in the src/python/csv folder.
Then, create an object in src/python/obj.py called BasePatient that map your csv.
Now create a request in src/python/msg.py called PatientRequest that has a variable resource typed BasePatient.
The final step is the DataTransformation, for this, go to src/python/bp.py and add your DT. First add if isinstance(request, PatientRequest): and then map your request resource to a fhir.resource Patient.
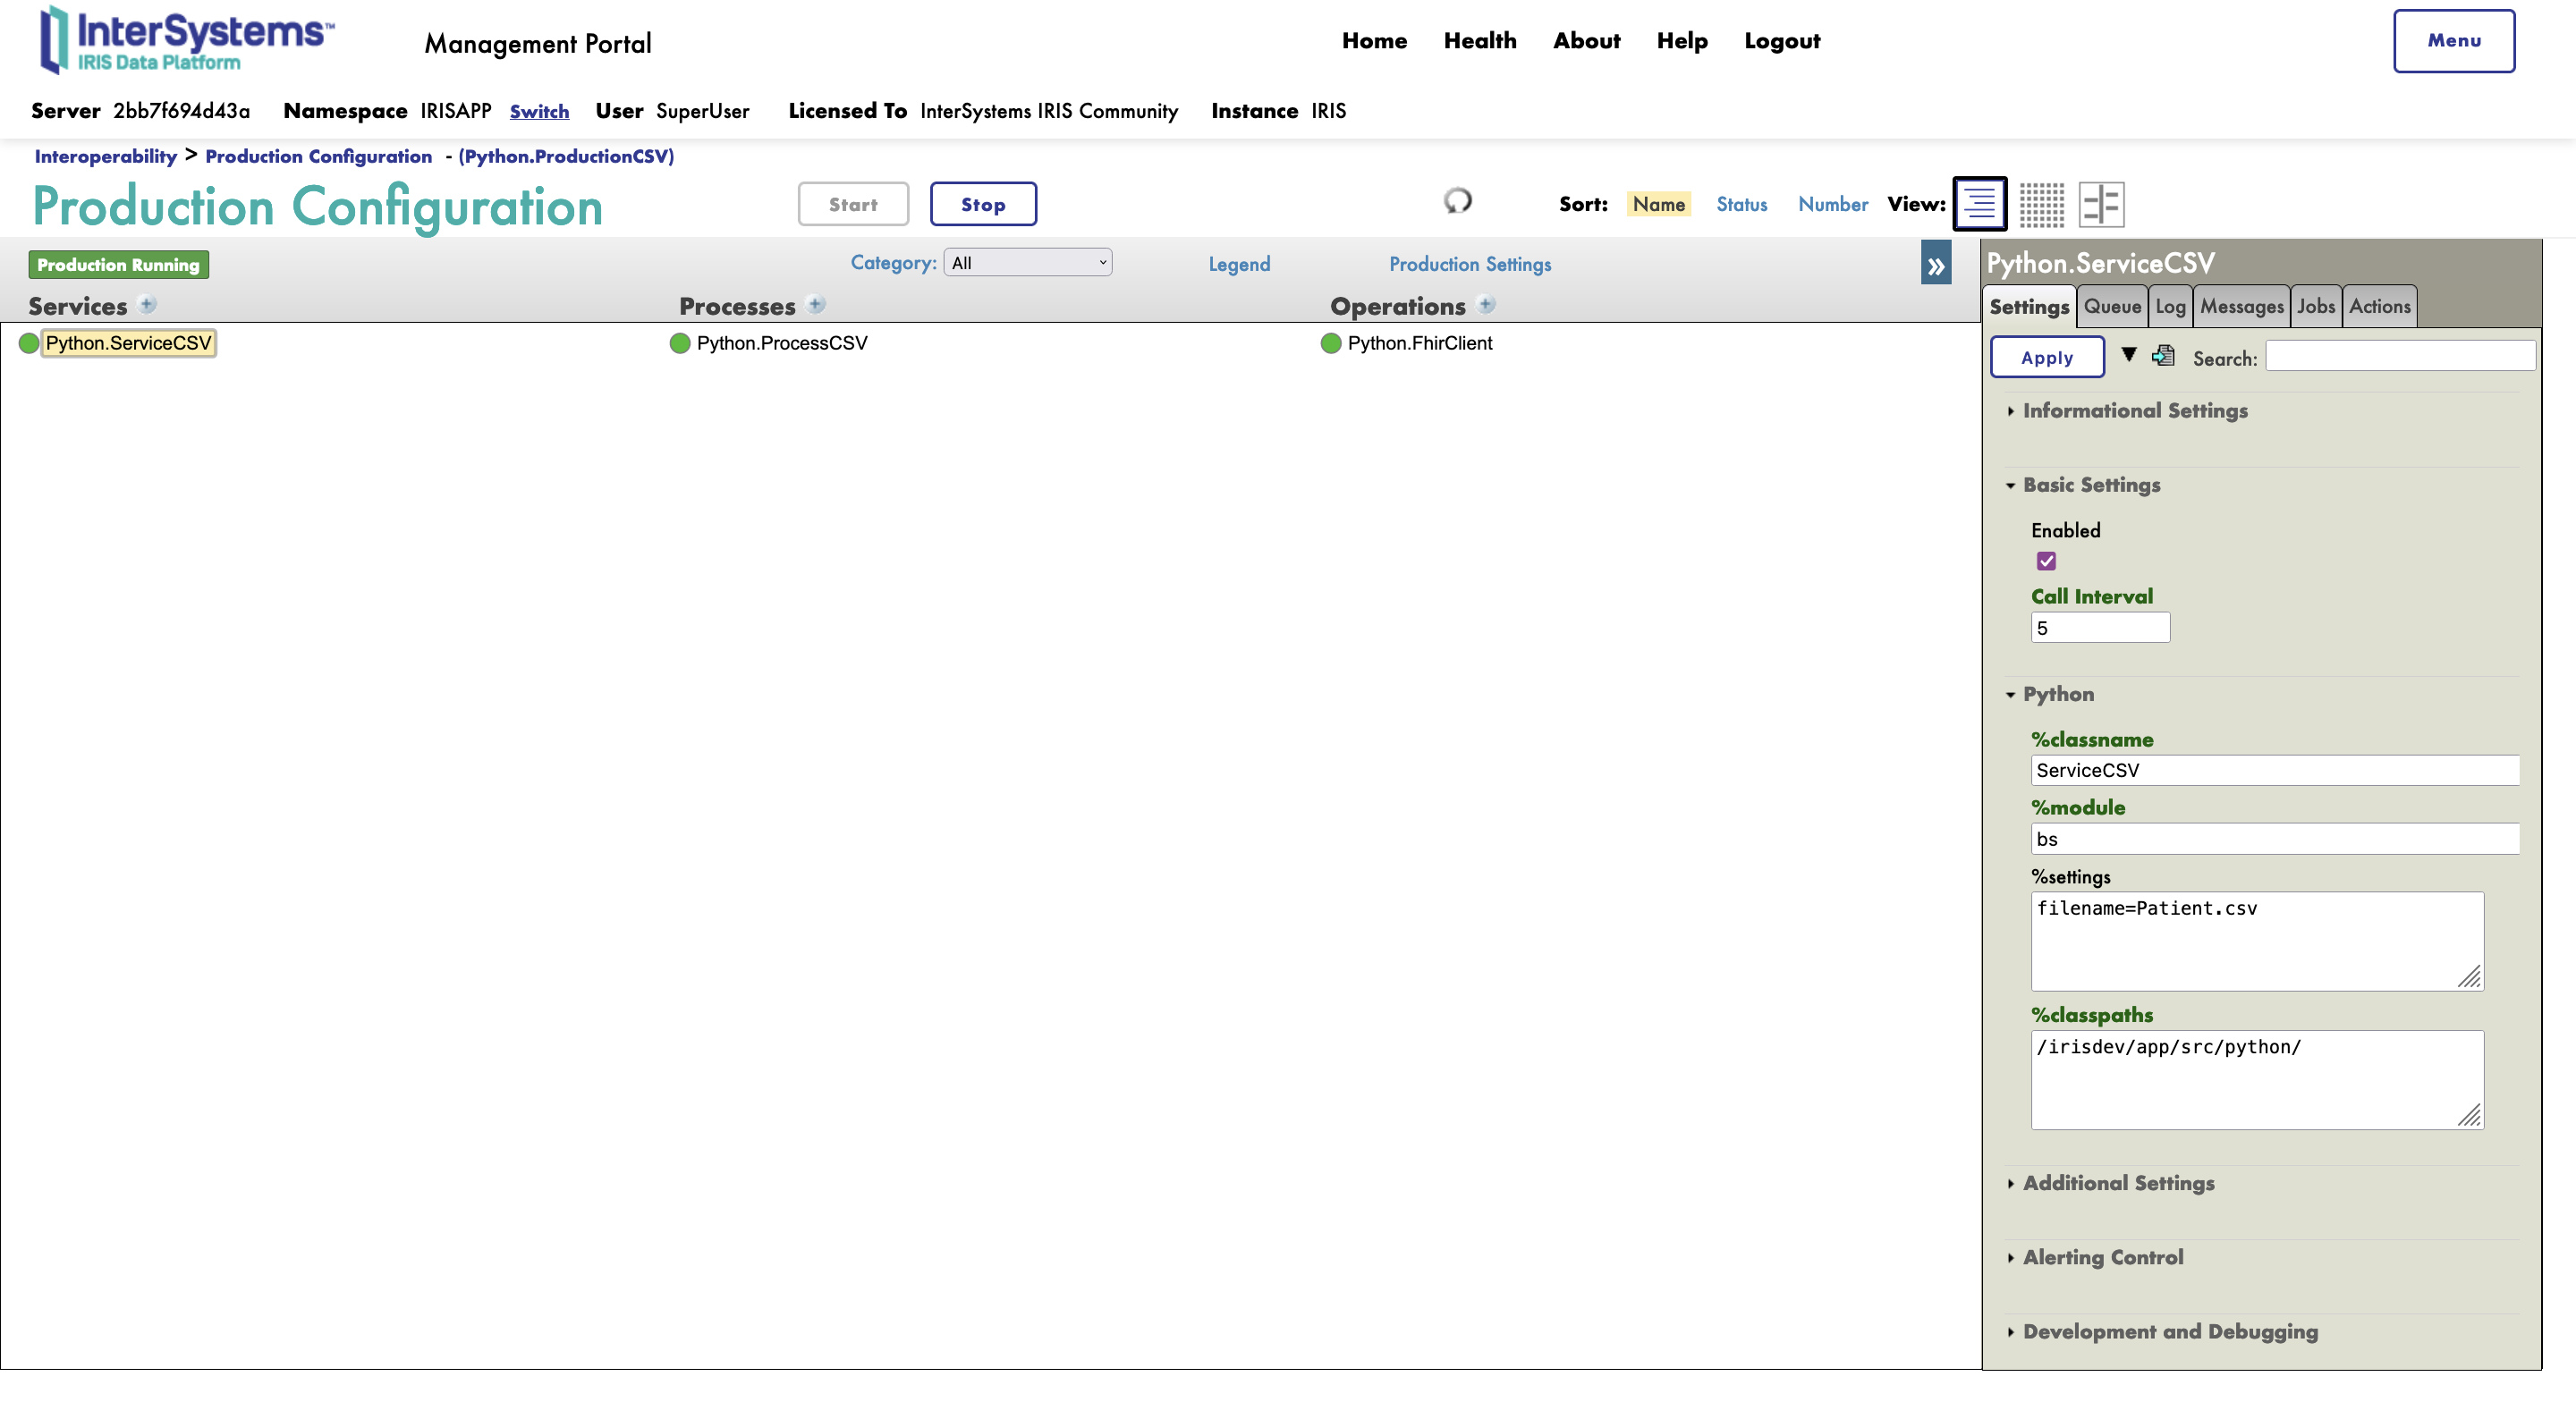
Now if you go into the management portal and change the setting of the ServiceCSV to add filename=Patient.csv you can just start the production and see your transformation unfold and you client send the information to the server.
Detailled steps to create a new transformation
If you are unsure of what to do or how to do it here is a step by step creation of a new transformation :
Create the file Patient.csv n the src/python/csv folder and fill it with:
family;given;system;value
FamilyName1;GivenName1;phone;555789675
FamilyName2;GivenName2;phone;023020202
Our CSV hold a family name, a given name and a phone number for two patients.
In src/python/obj.py write :
@dataclass
class BasePatient:
    family:str = None
    given:str = None
    system:str = None
    value:str = None
In src/python/msg.py write:
from obj import BasePatient
@dataclass
class PatientRequest(Message):
    resource:BasePatient = None
In src/python/bp.py write:
from msg import PatientRequest
from fhir.resources.patient import Patient
from fhir.resources.humanname import HumanName
In src/python/bp.py in the on_request function write:
if isinstance(request,PatientRequest): base_patient = request.resourcepatient = Patient() name = HumanName() name.family = base_patient.family name.given = [base_patient.given] patient.name = [name] telecom = ContactPoint() telecom.value = base_patient.value telecom.system = base_patient.system patient.telecom = [telecom] msg = FhirRequest() msg.resource = patient self.send_request_sync("Python.FhirClient", msg)
Now if you go into the management portal and change the setting of the ServiceCSV to add filename=Patient.csv you can just stop and restart the production and see your transformation unfold and you client send the information to the server.
8. What’s inside the repo
8.1. Dockerfile
The simplest dockerfile to start a Python container.
Use docker-compose up to build and reopen your file in the container to work inside of it.
8.2. .vscode/settings.json
Settings file.
8.3. .vscode/launch.json
Config file if you want to debug.
Last checked by moderator
27 Jun, 2023WorksMade with
Version
2.027 Nov, 2022
ObjectScript quality test
PassedView reportCategory
Works with
InterSystems IRIS for HealthFirst published
27 Nov, 2022Last edited
29 Nov, 2022